
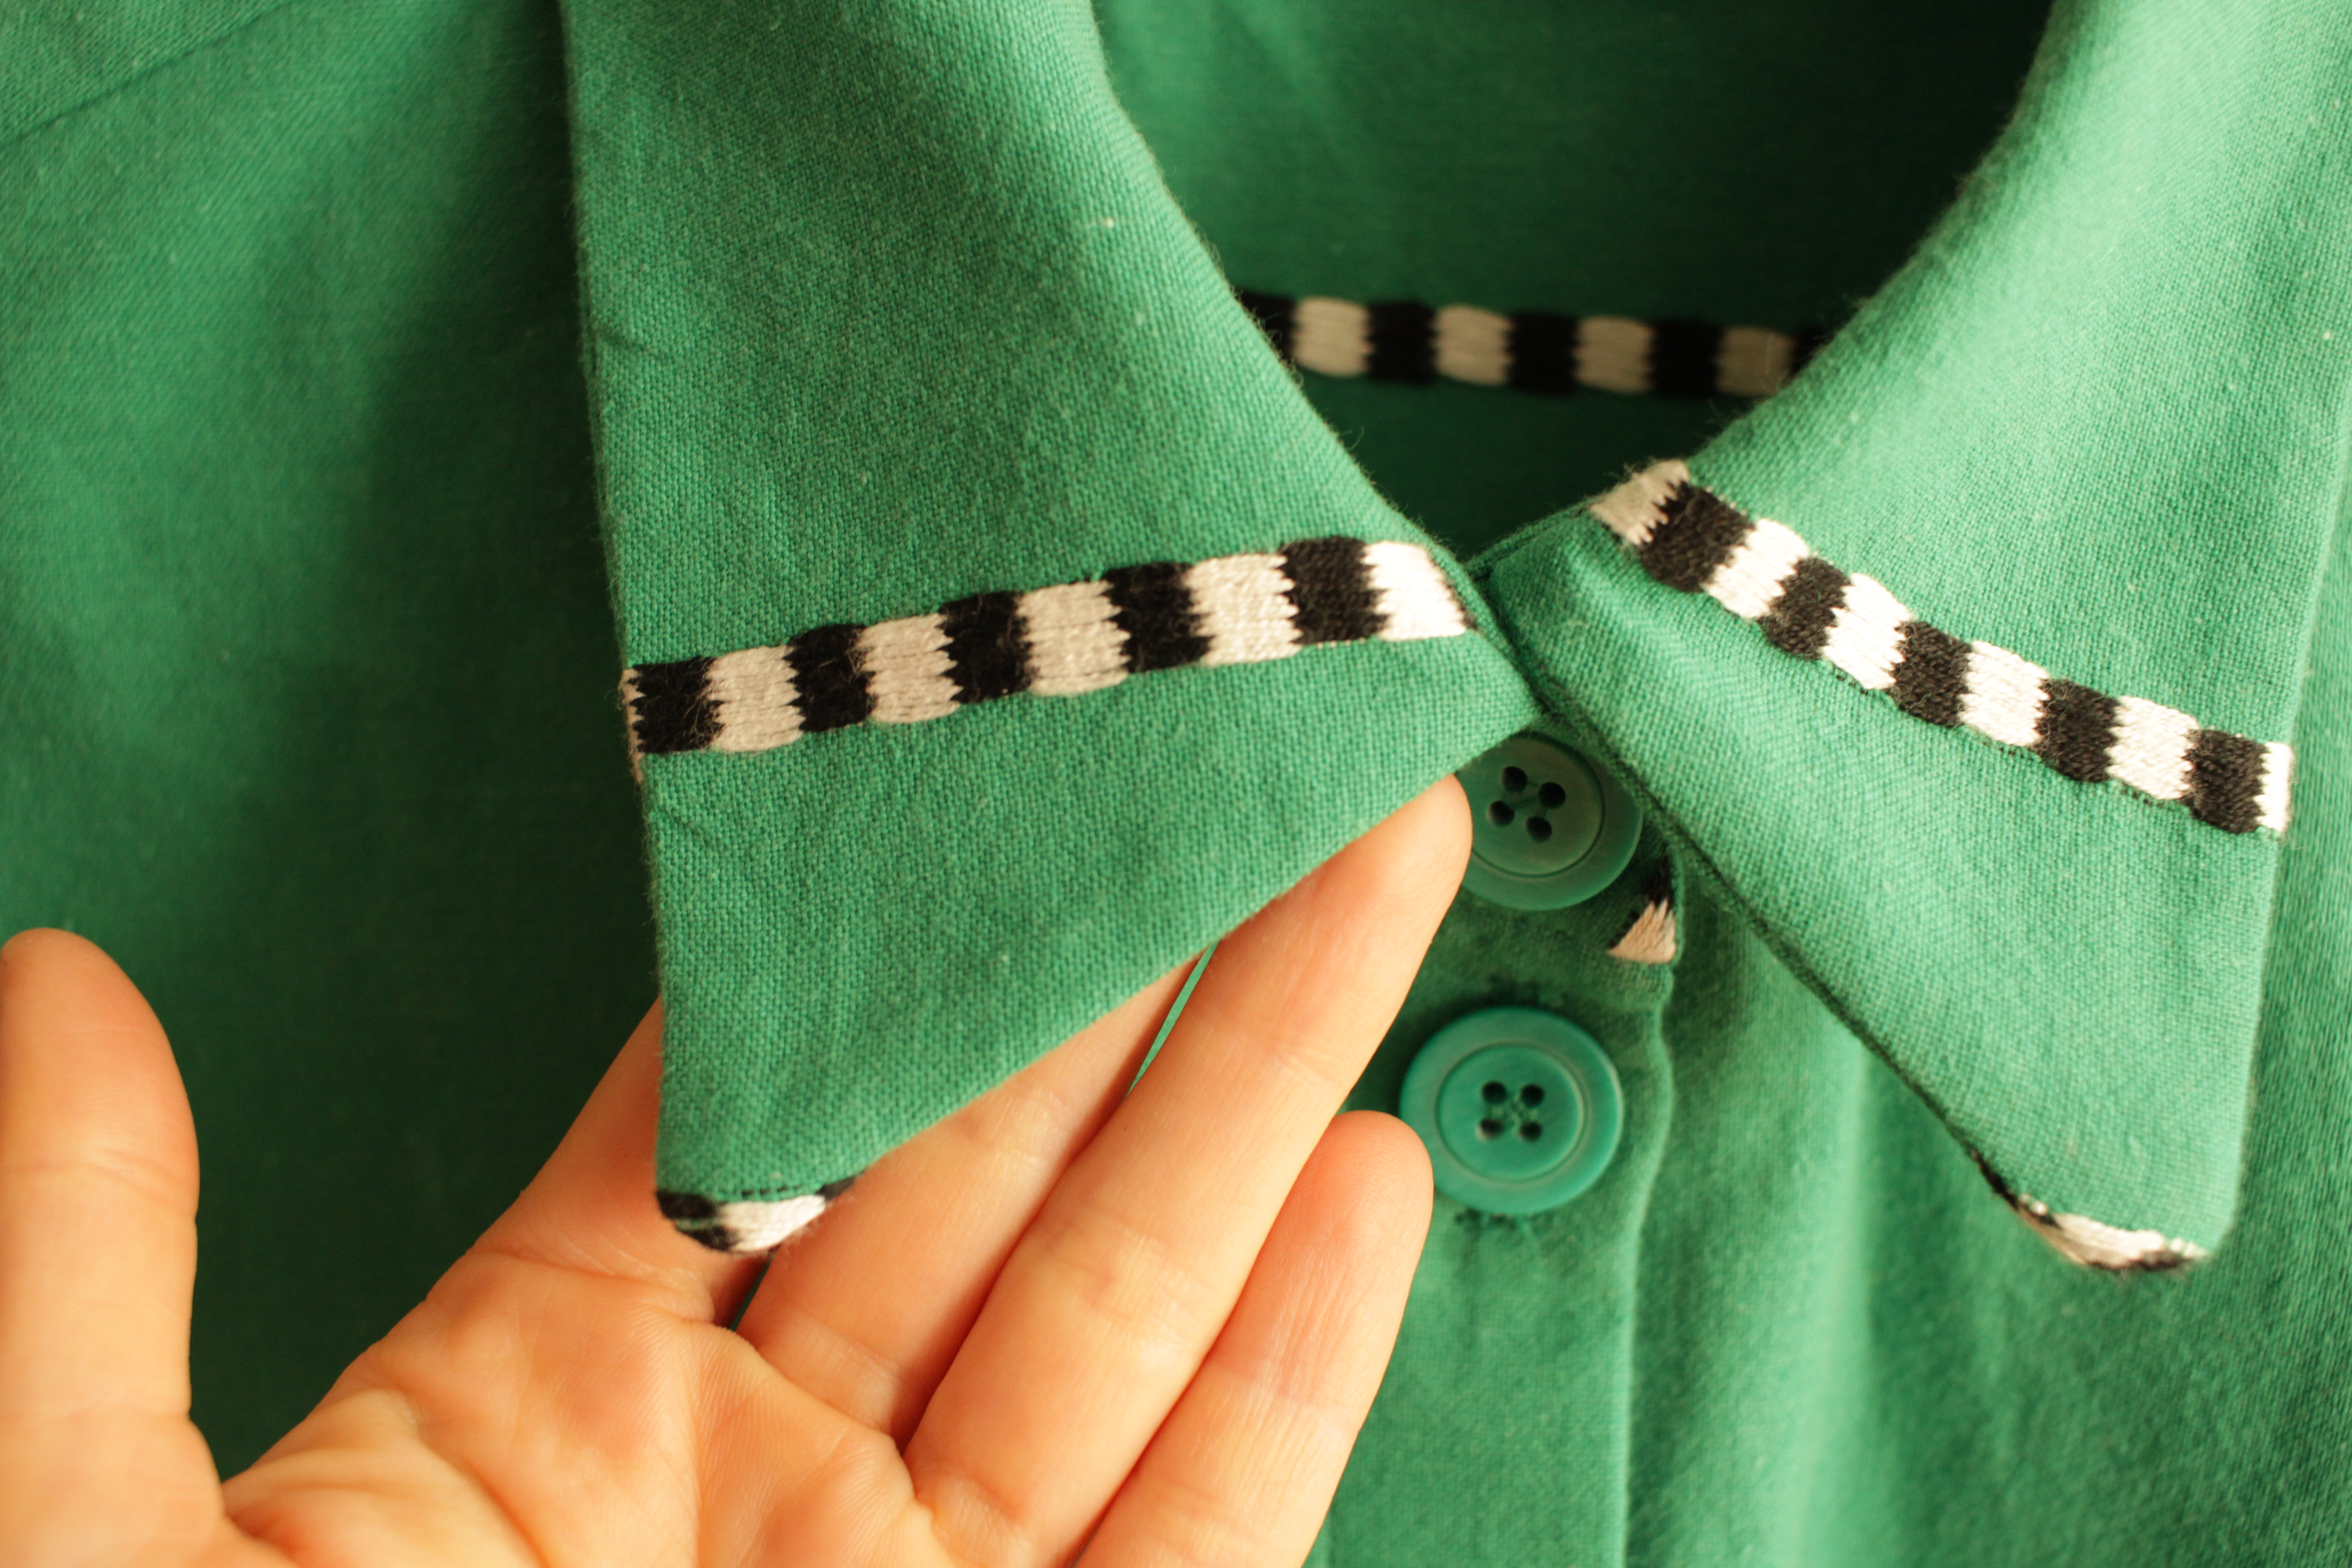
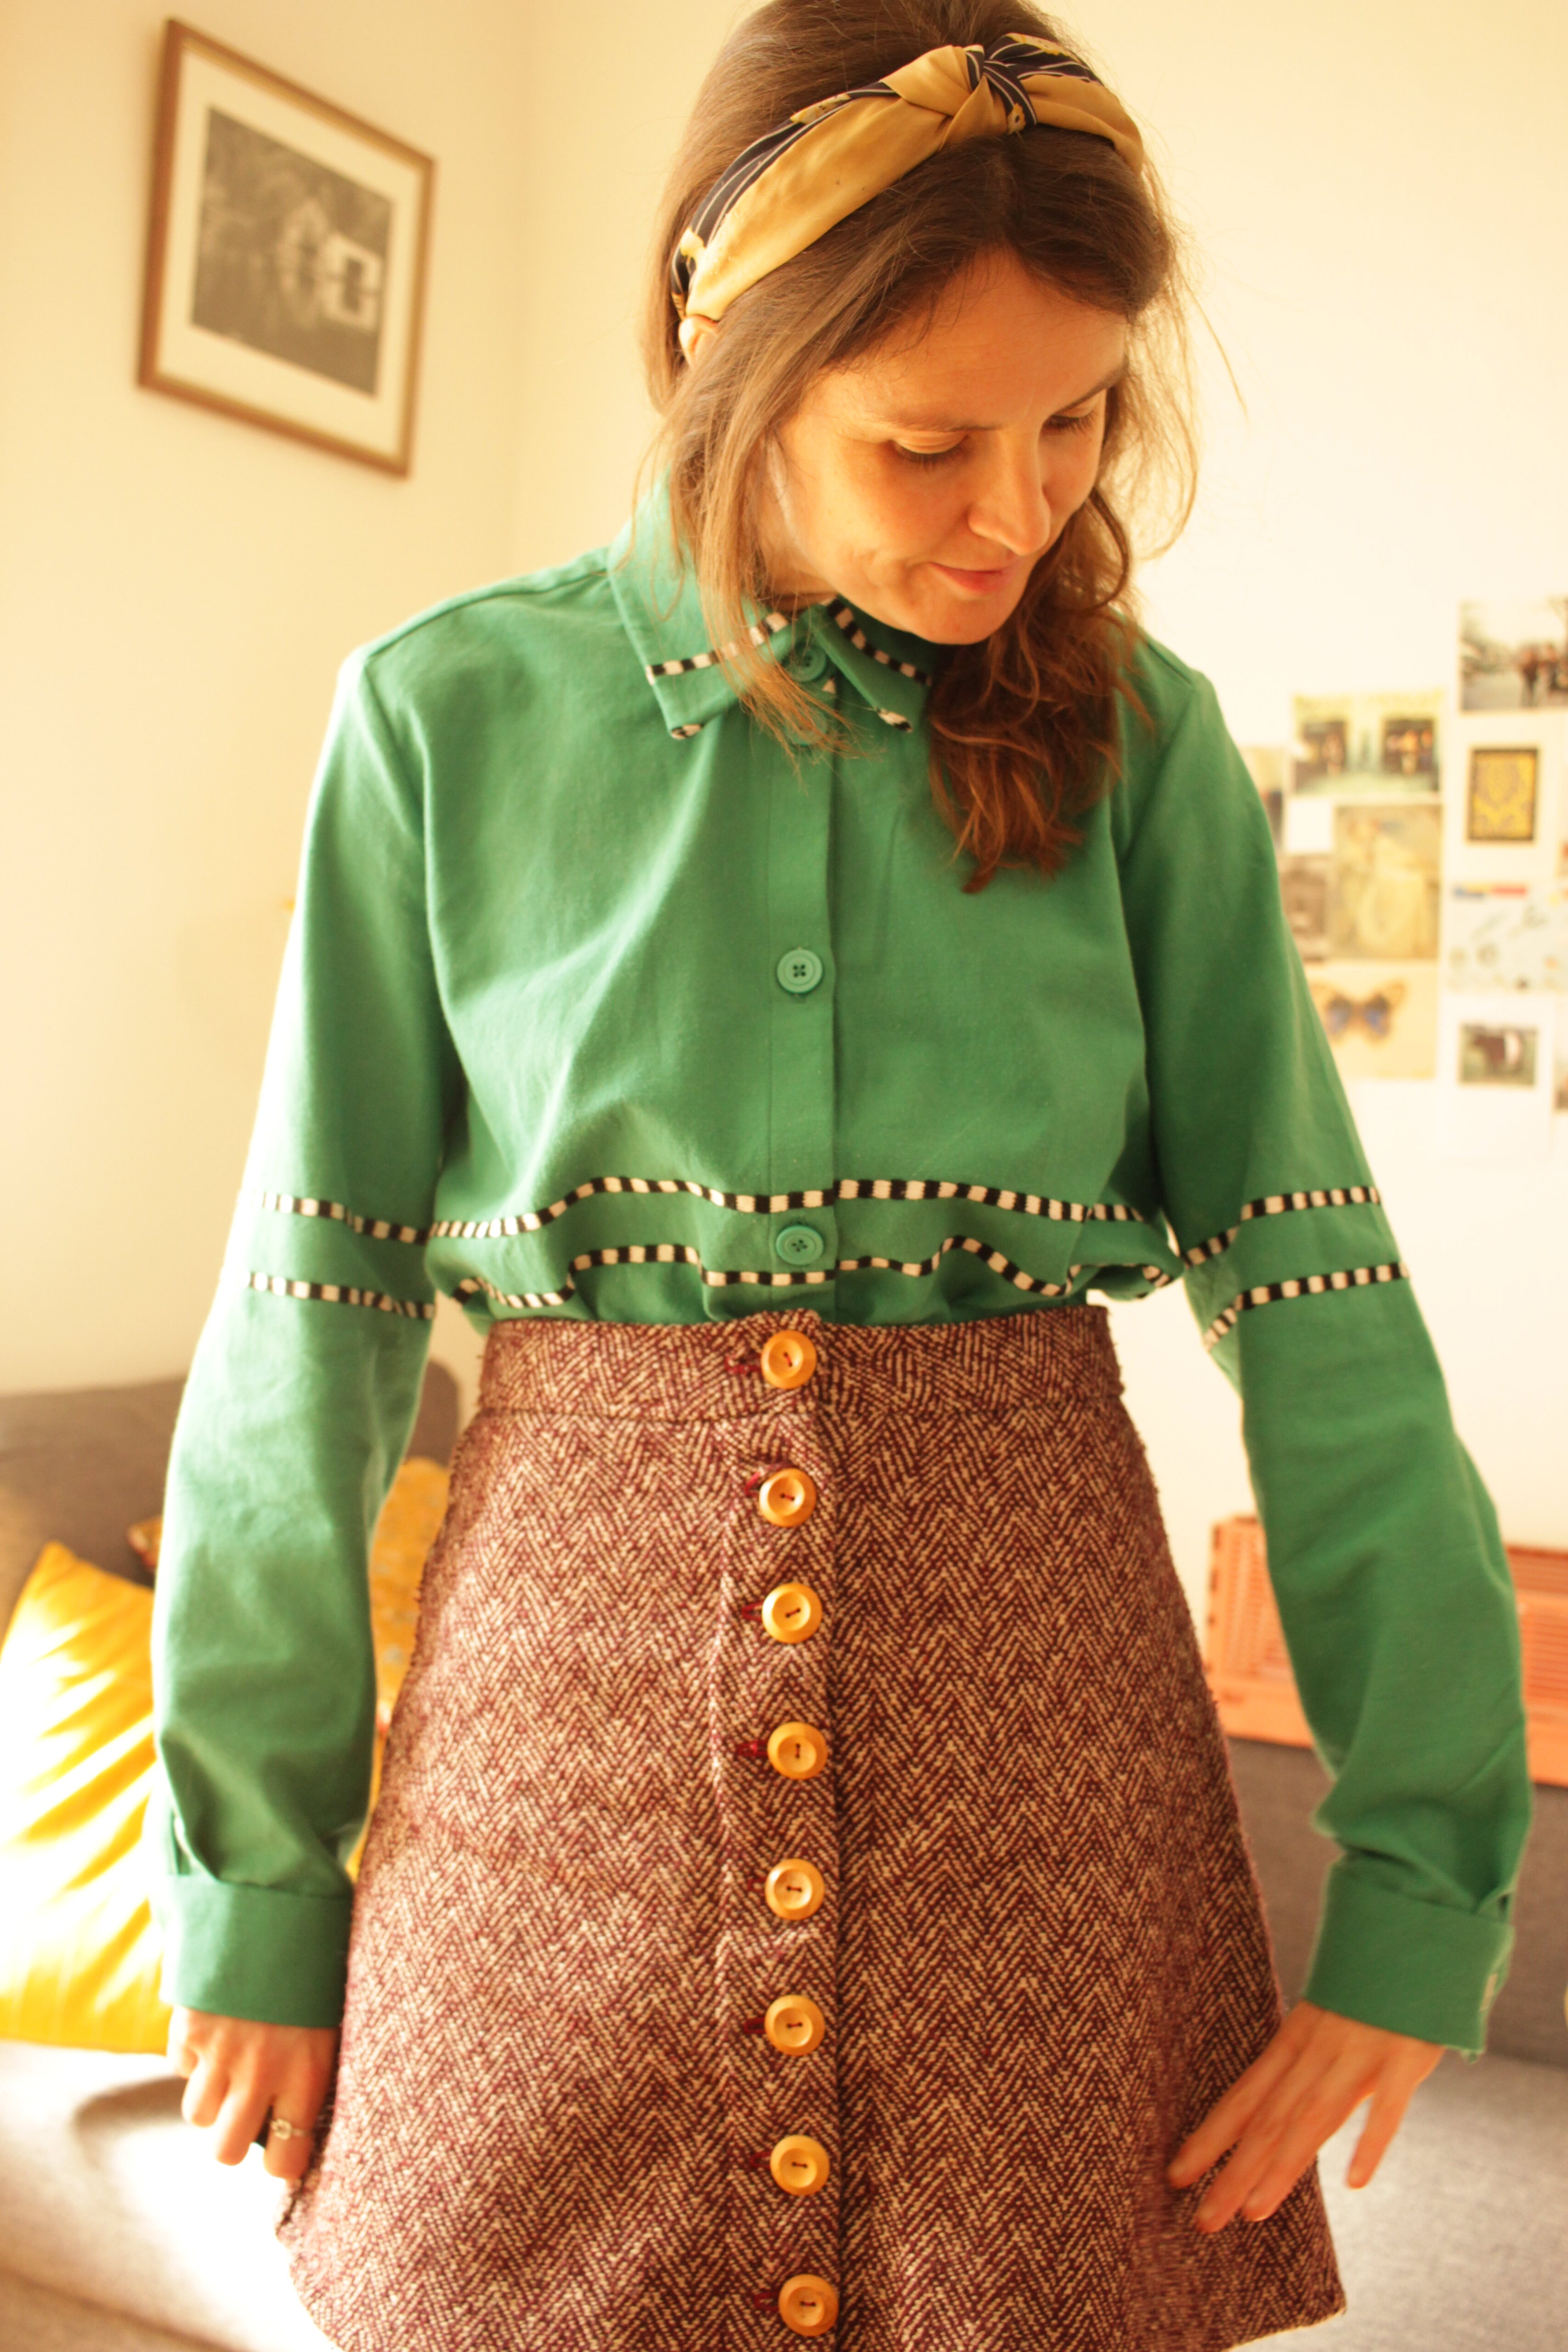
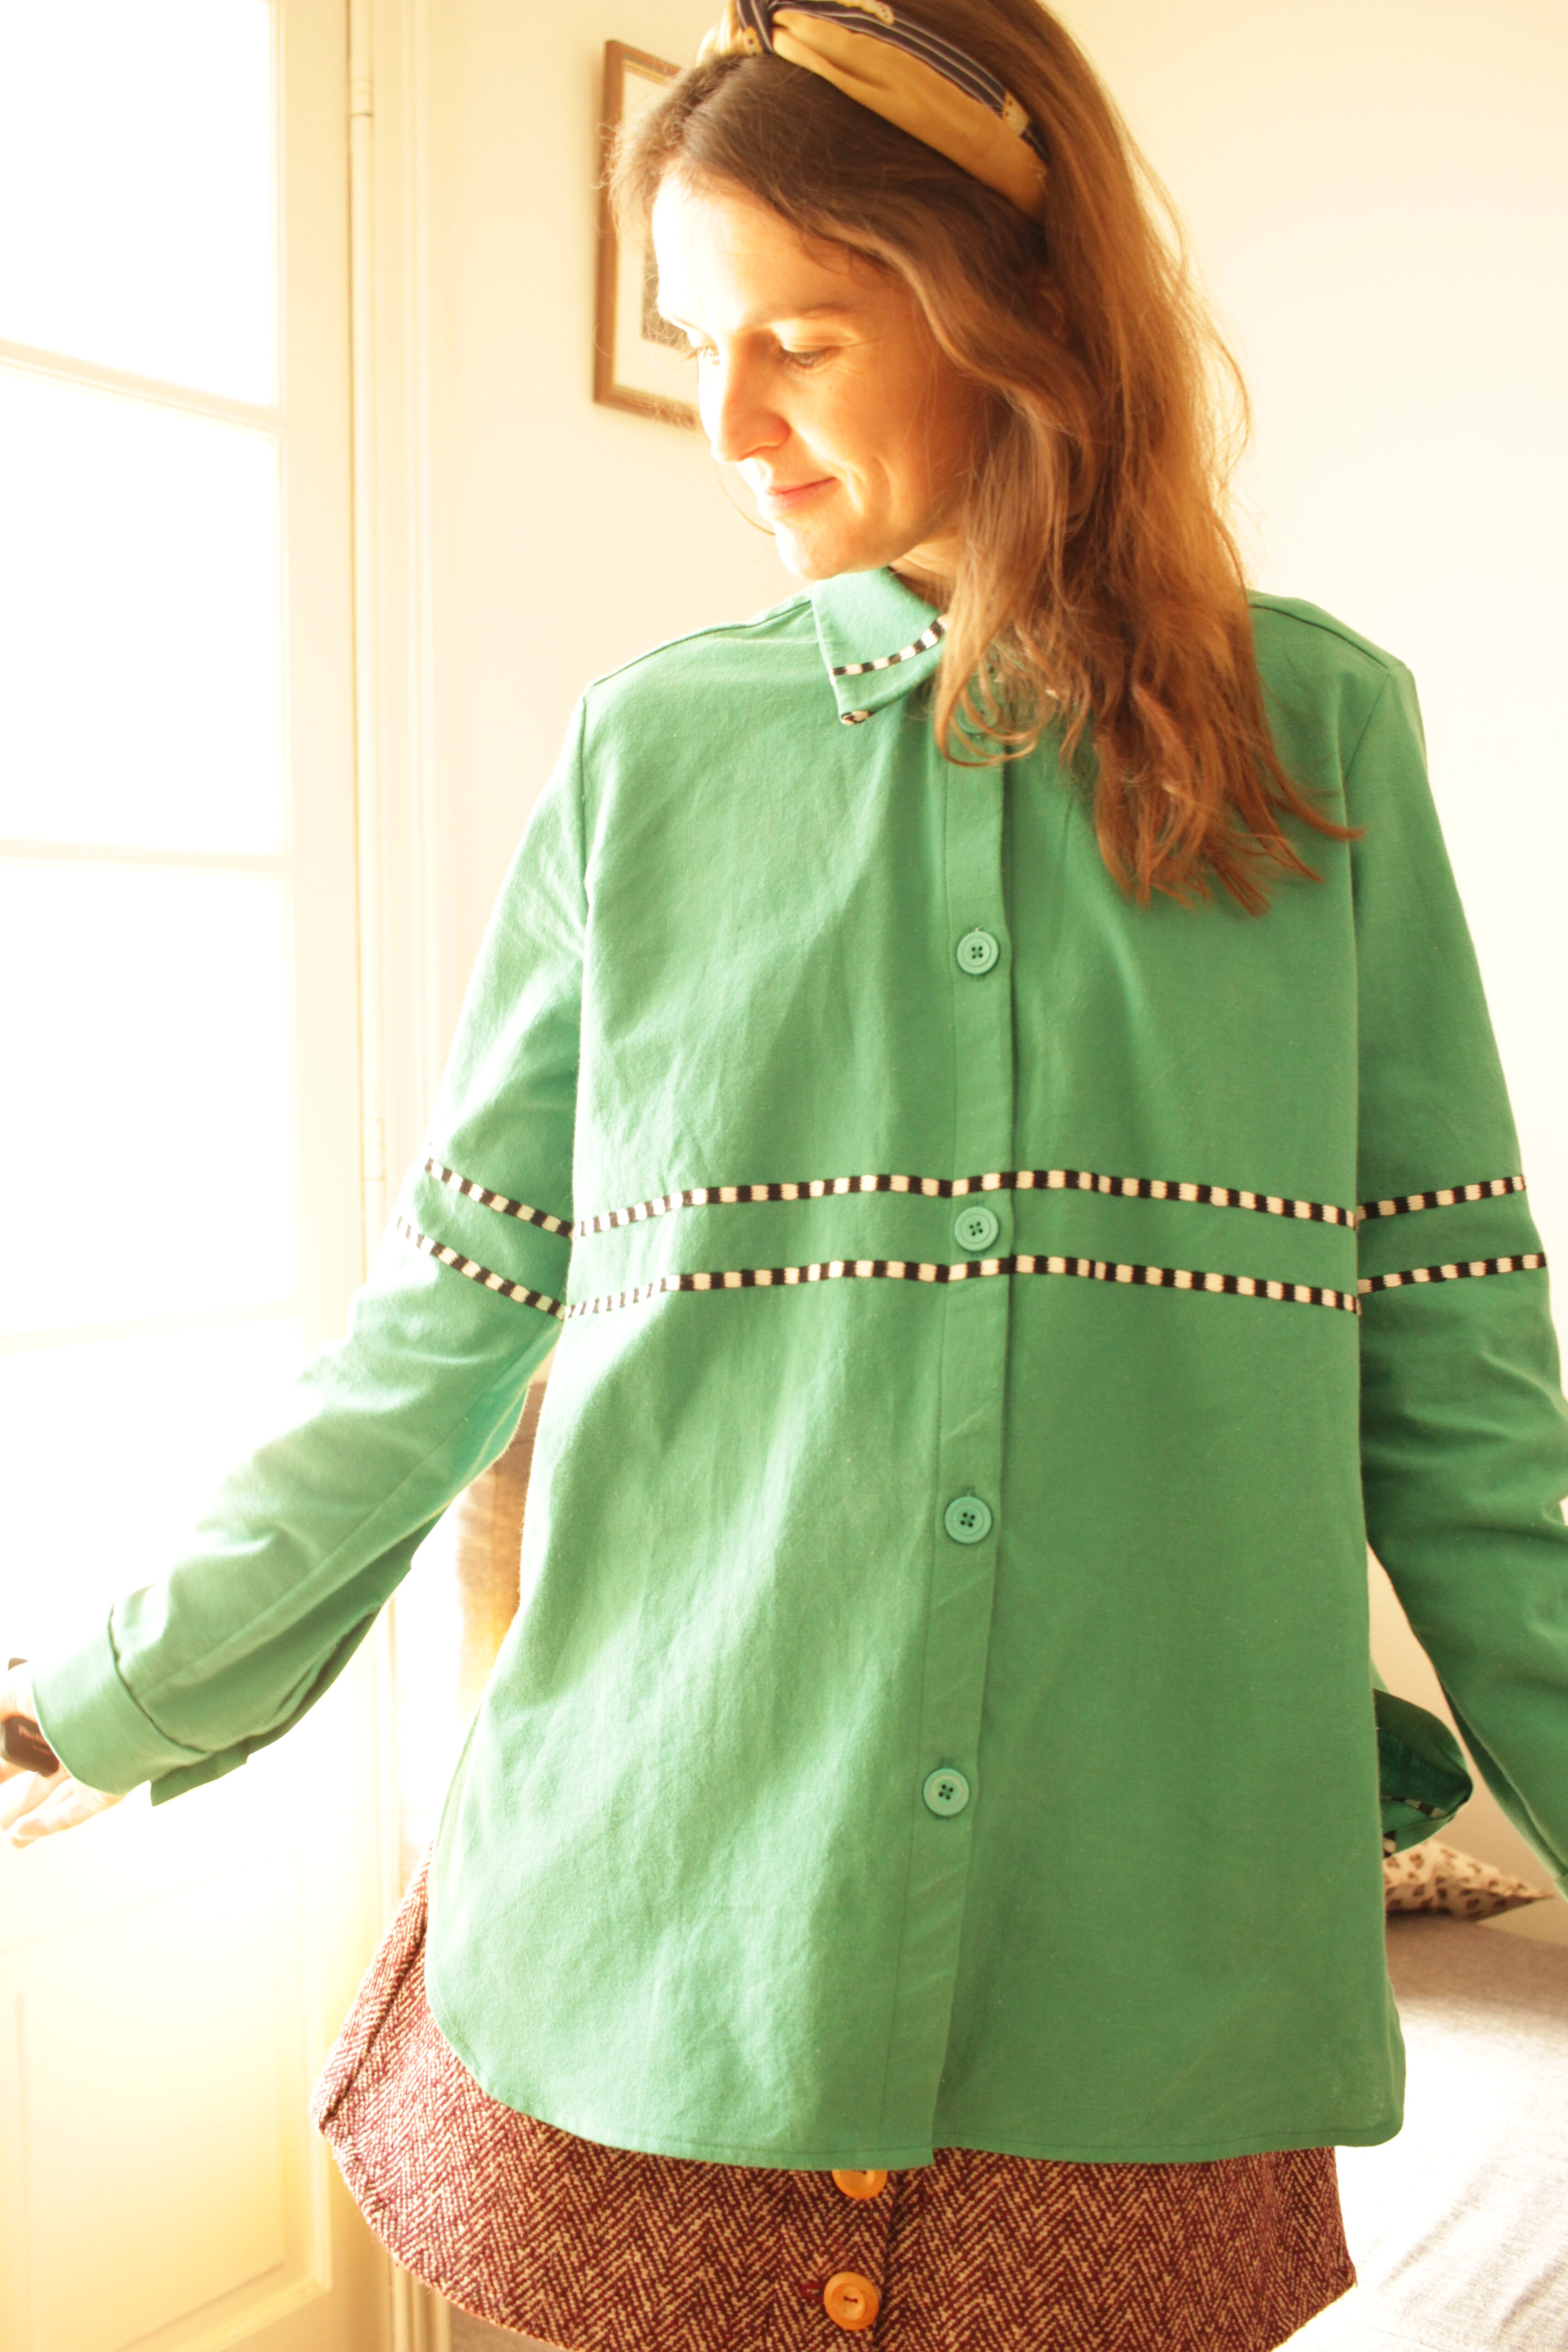
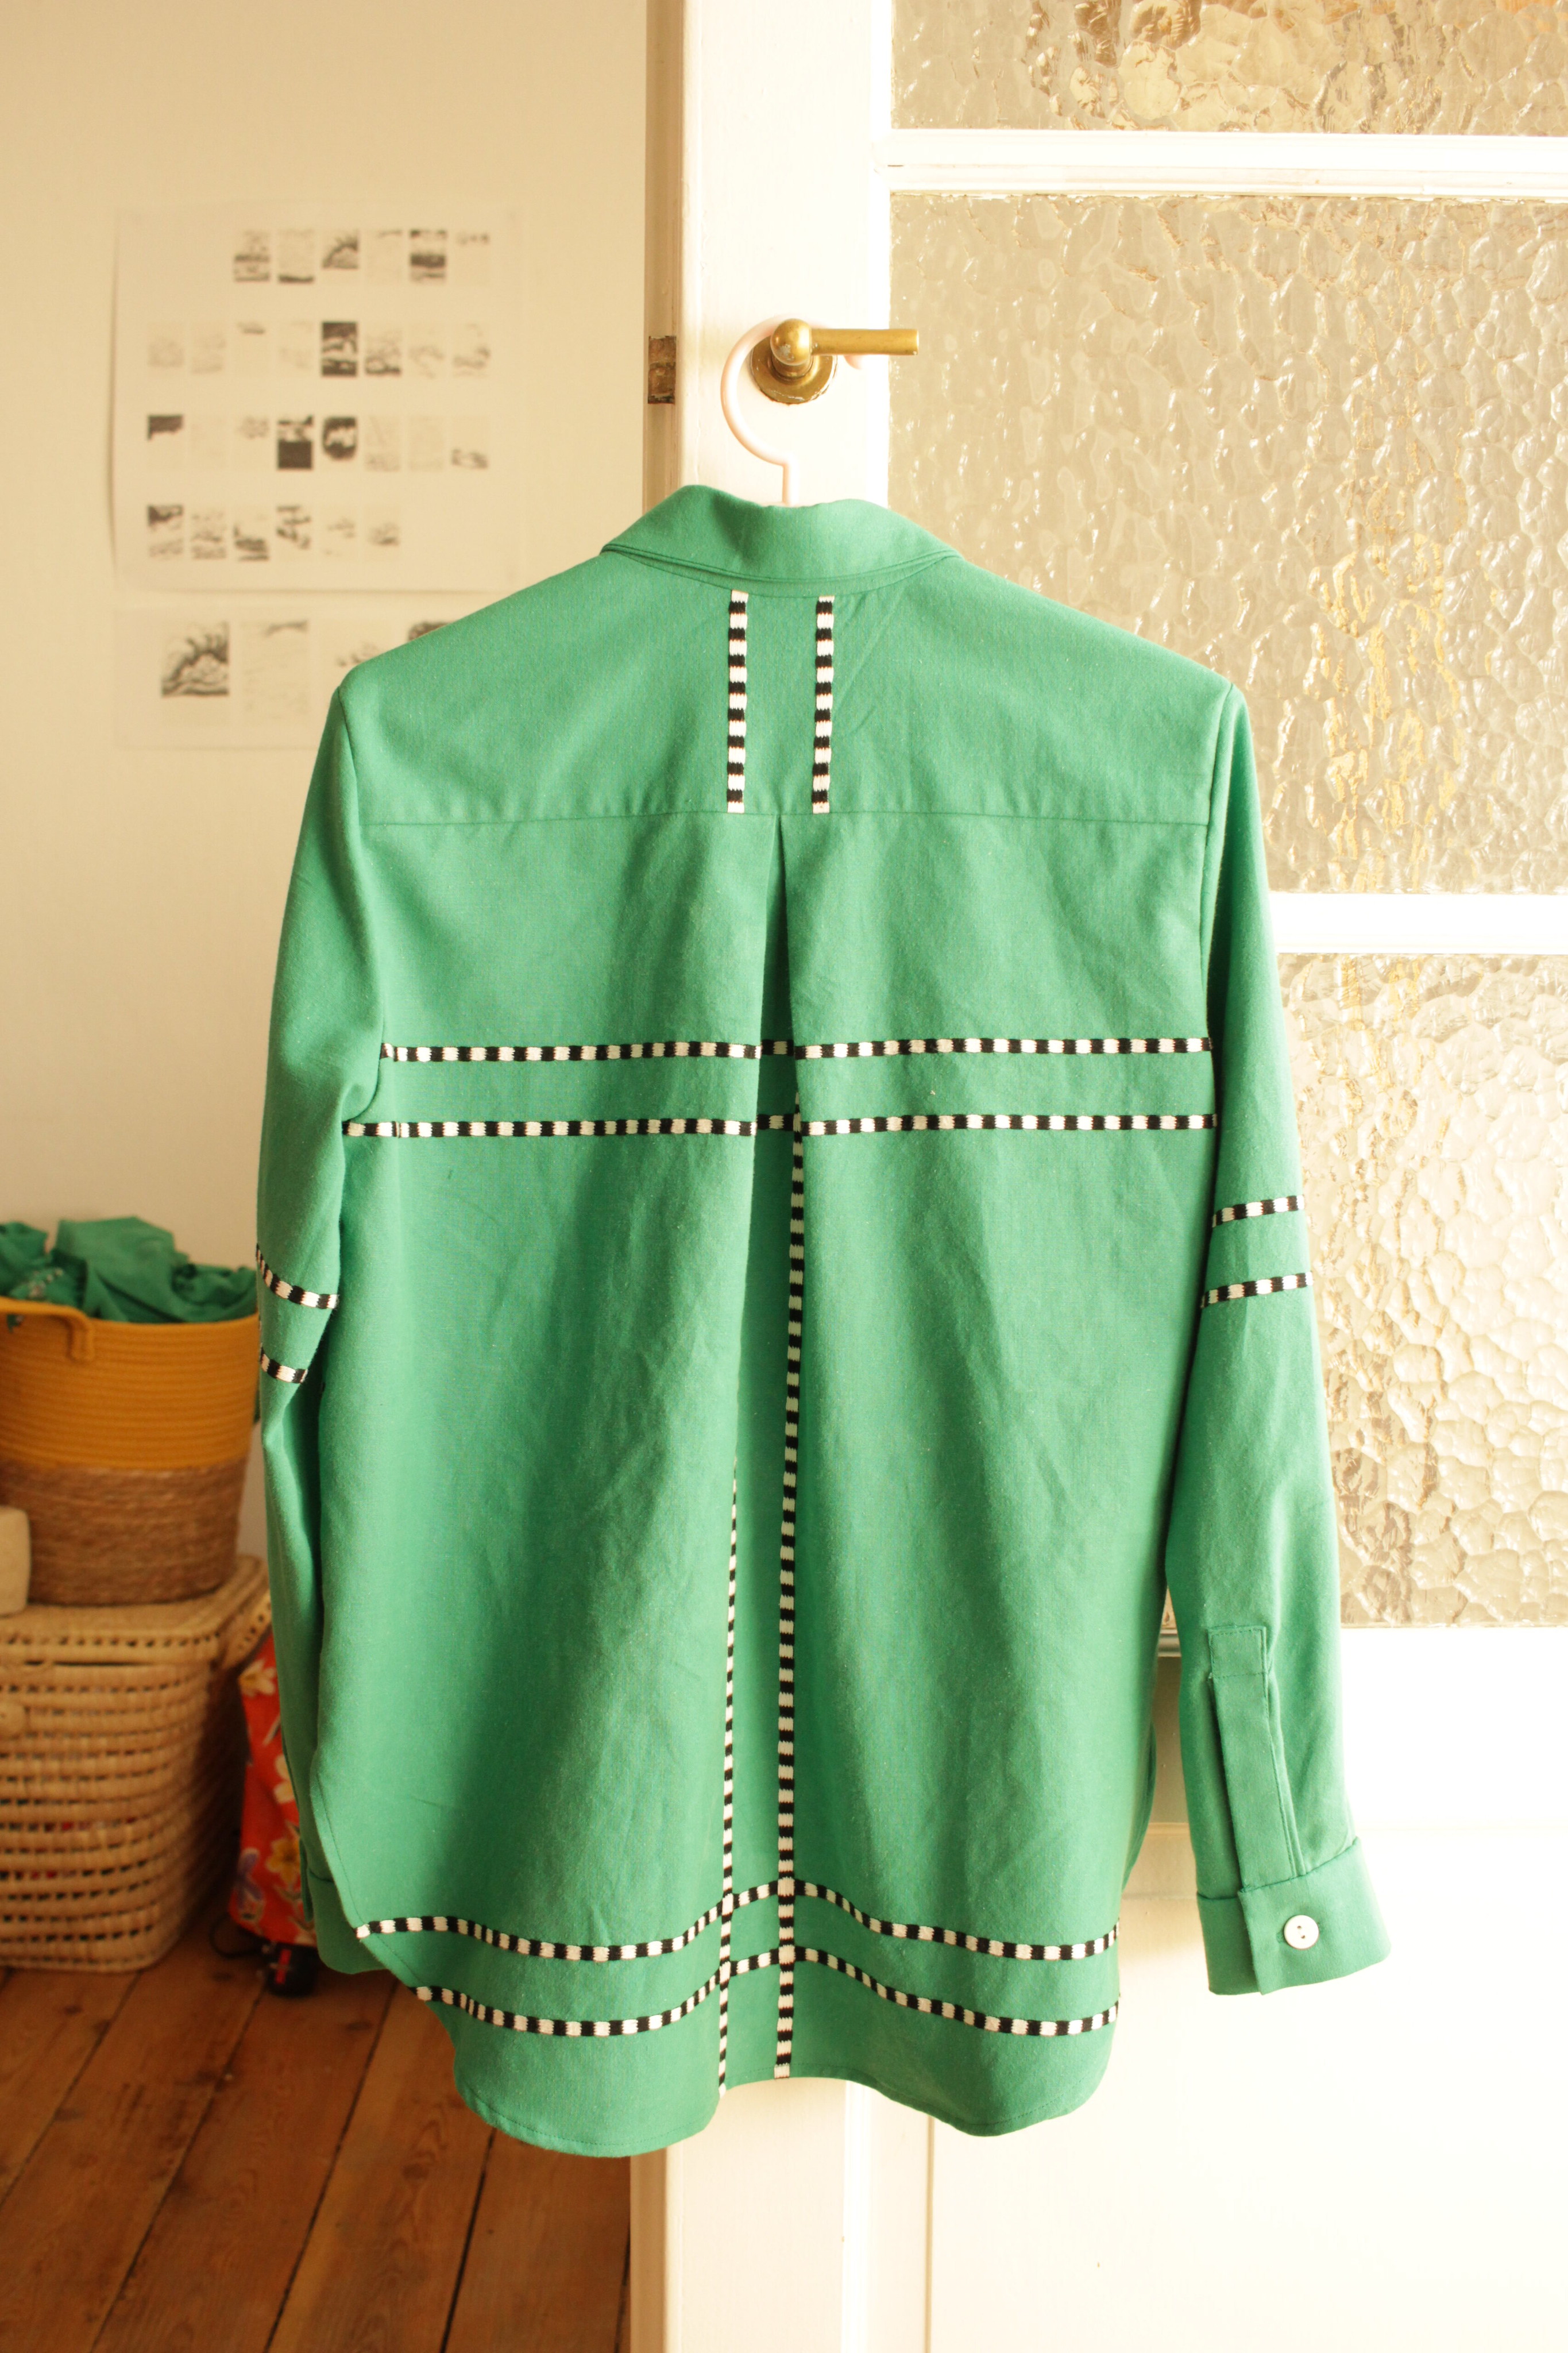
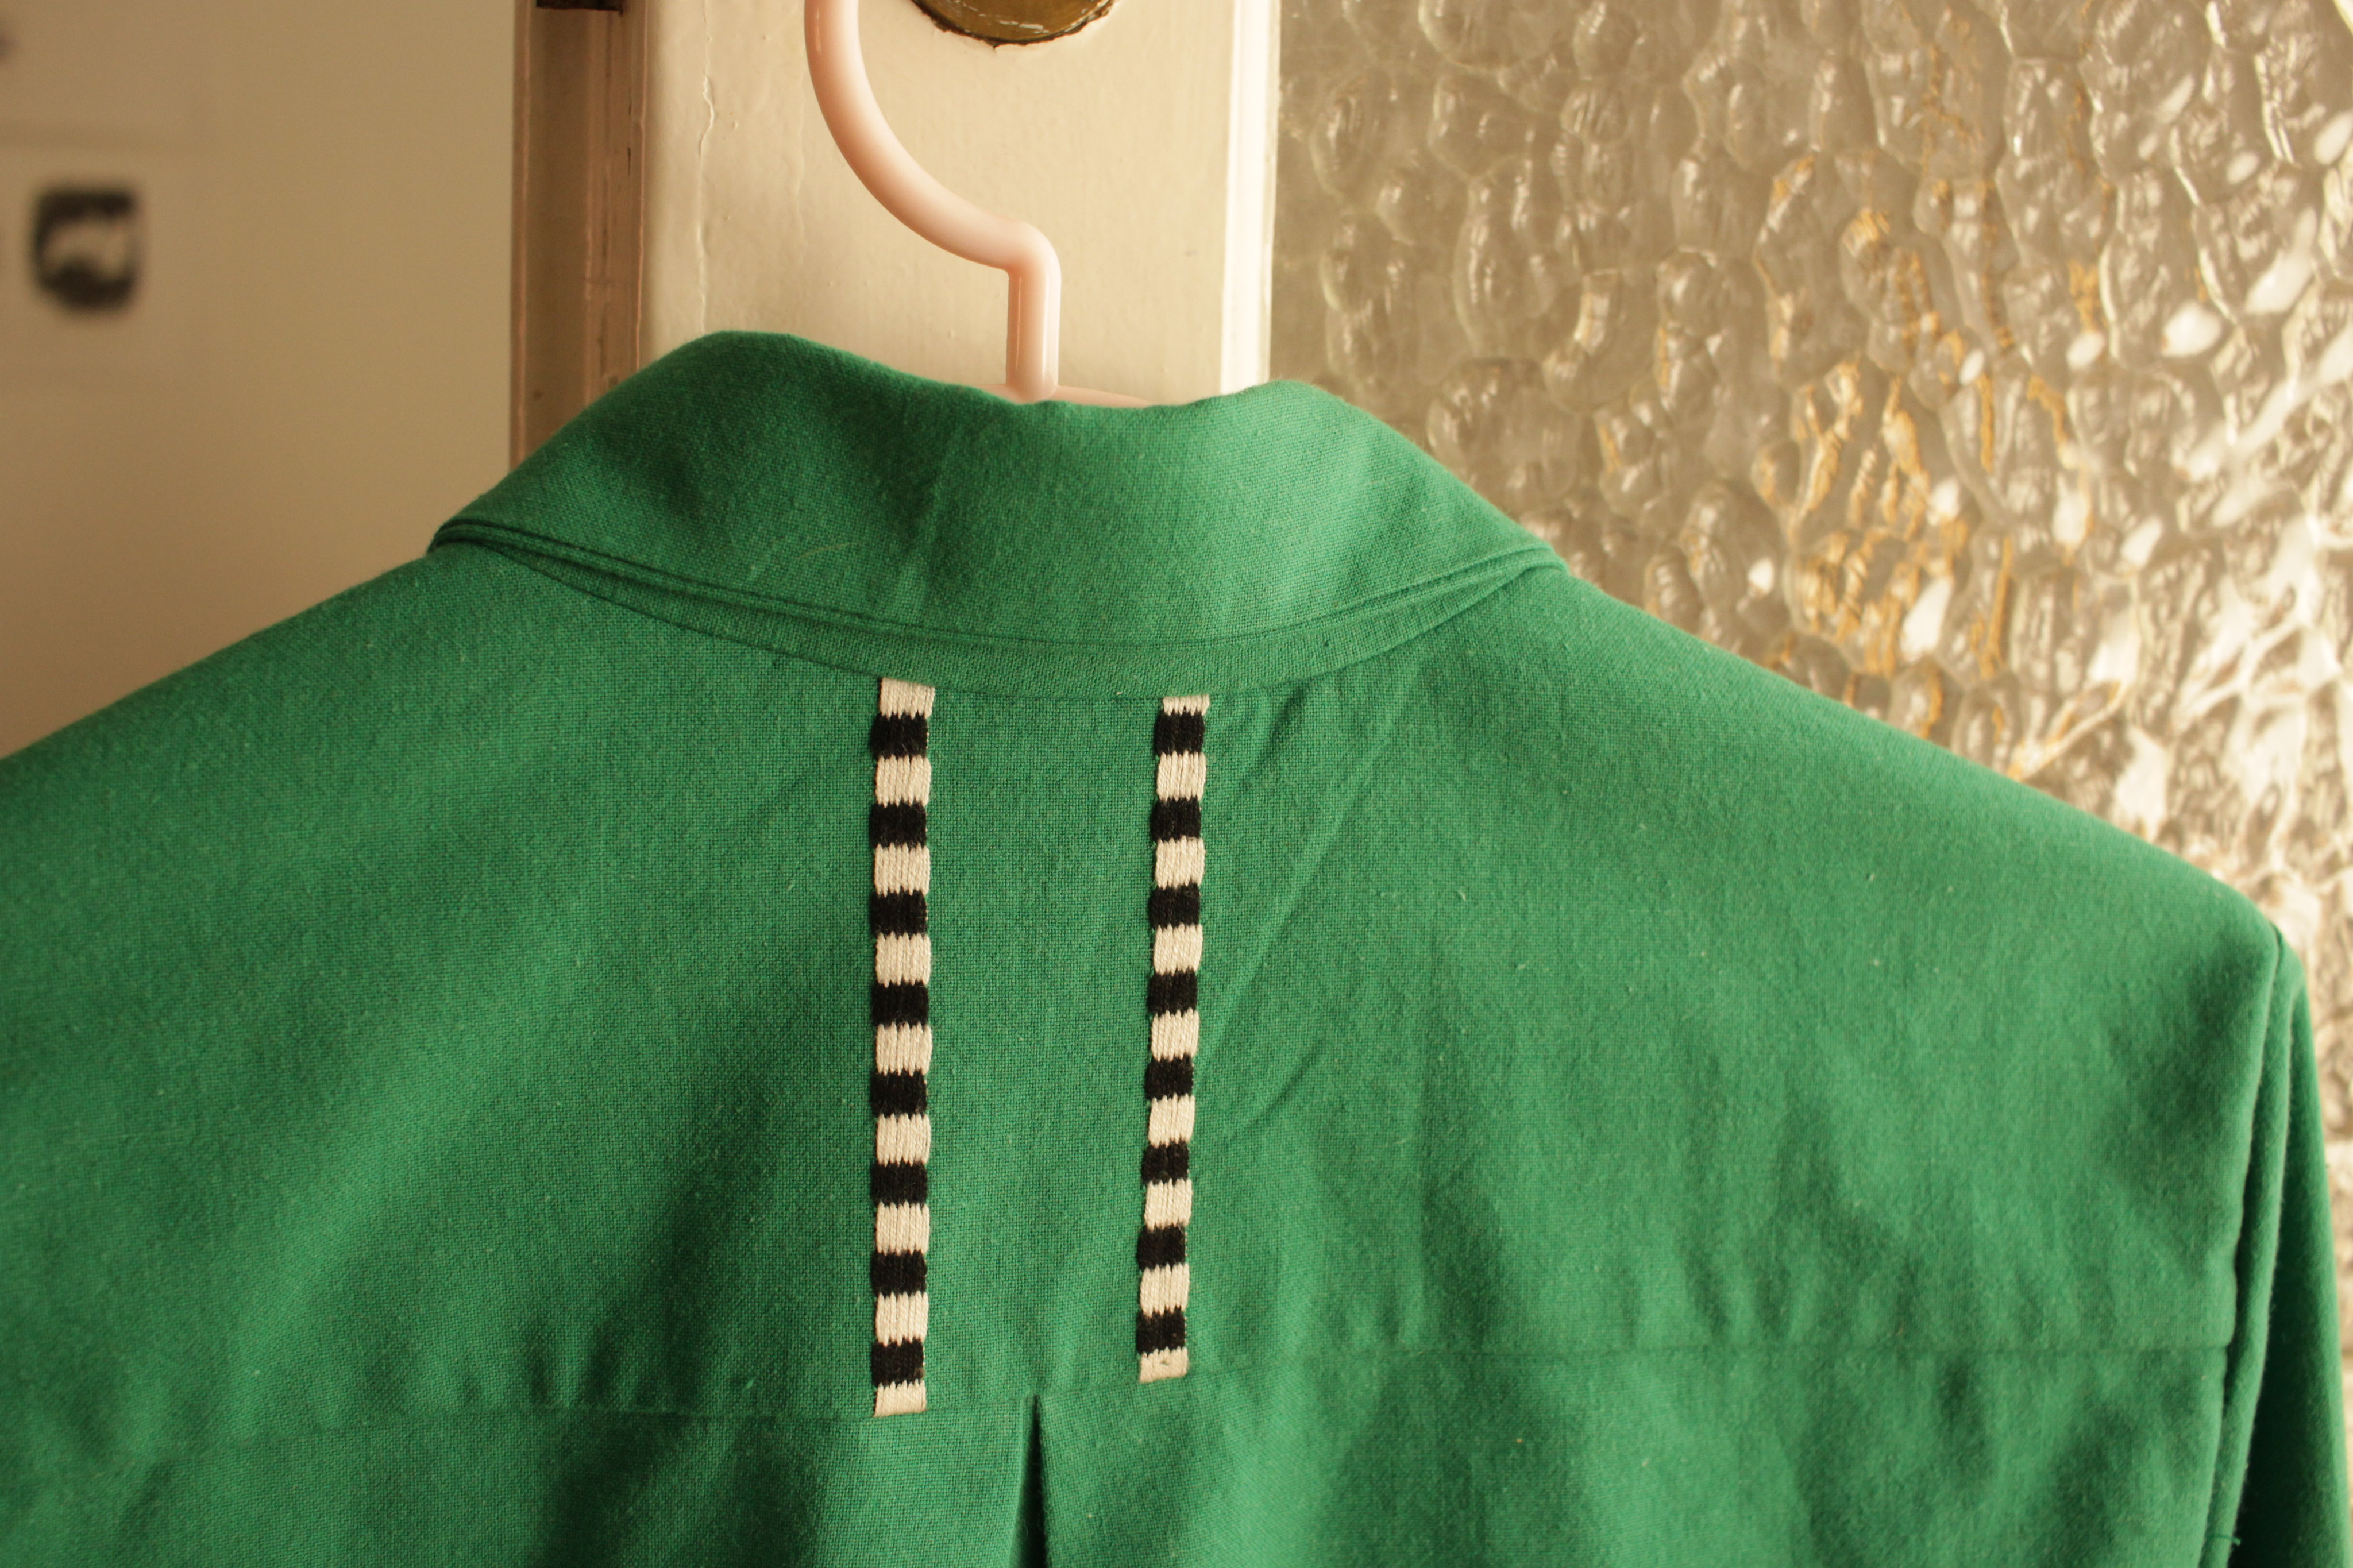
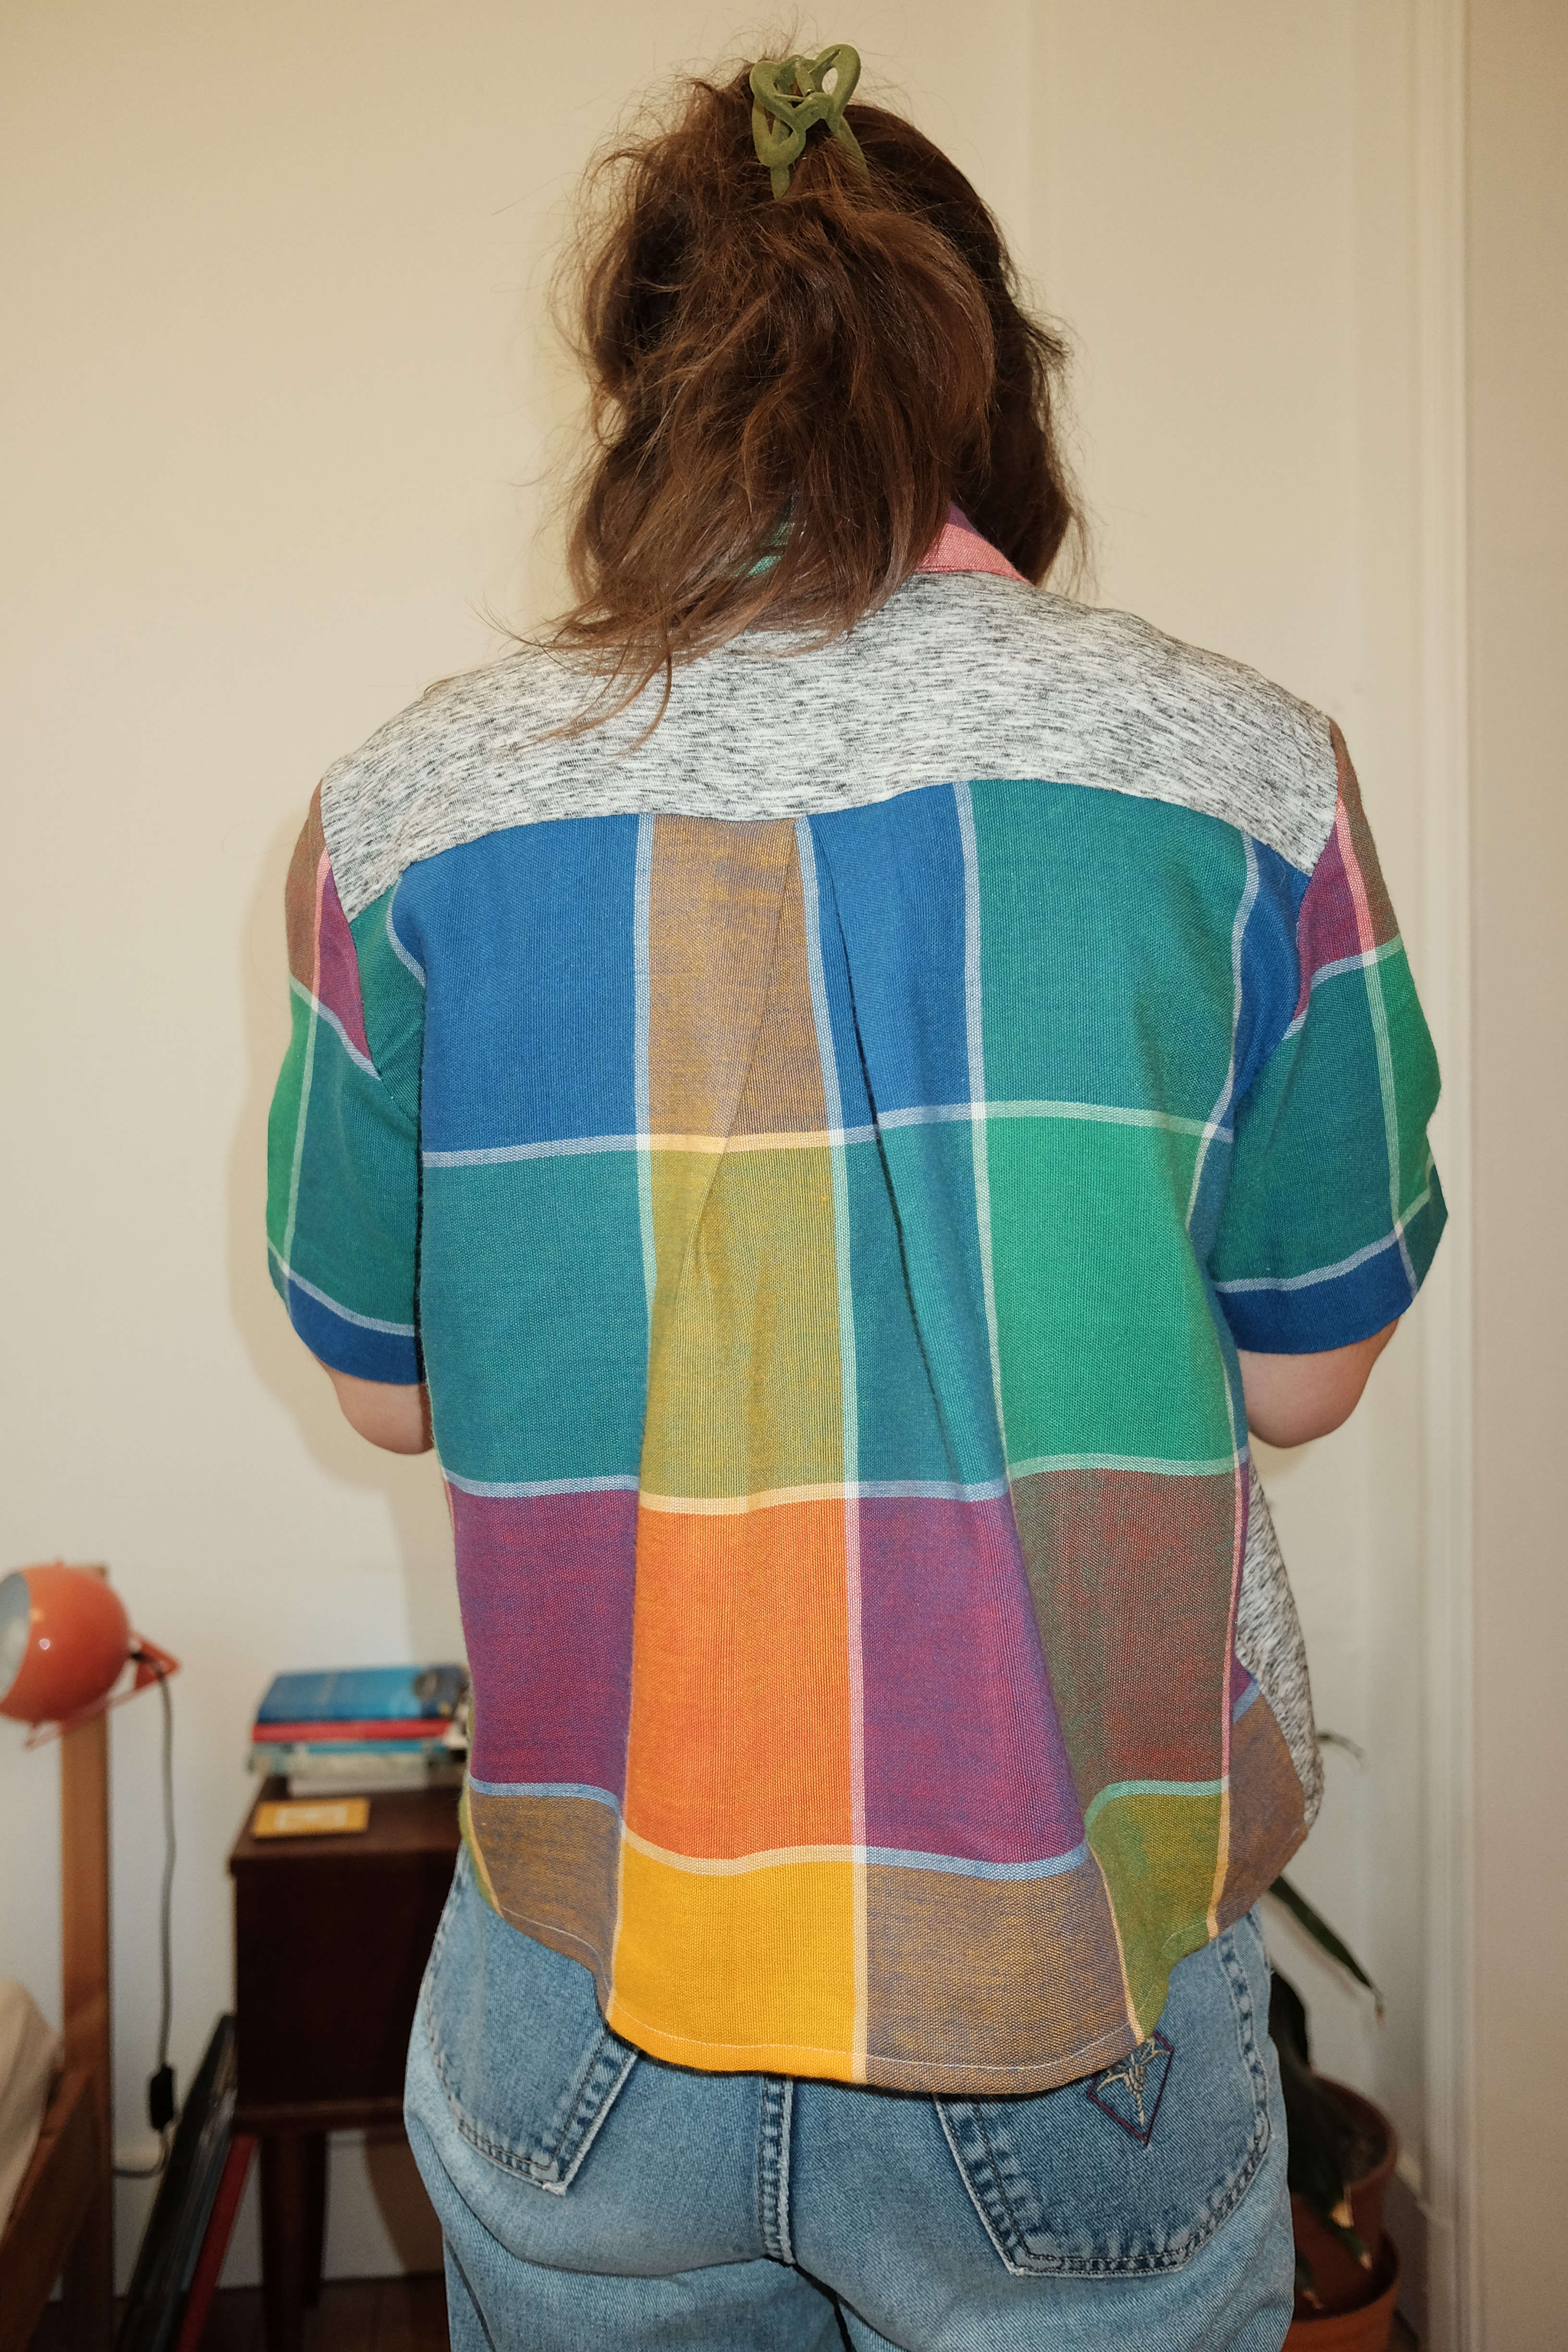
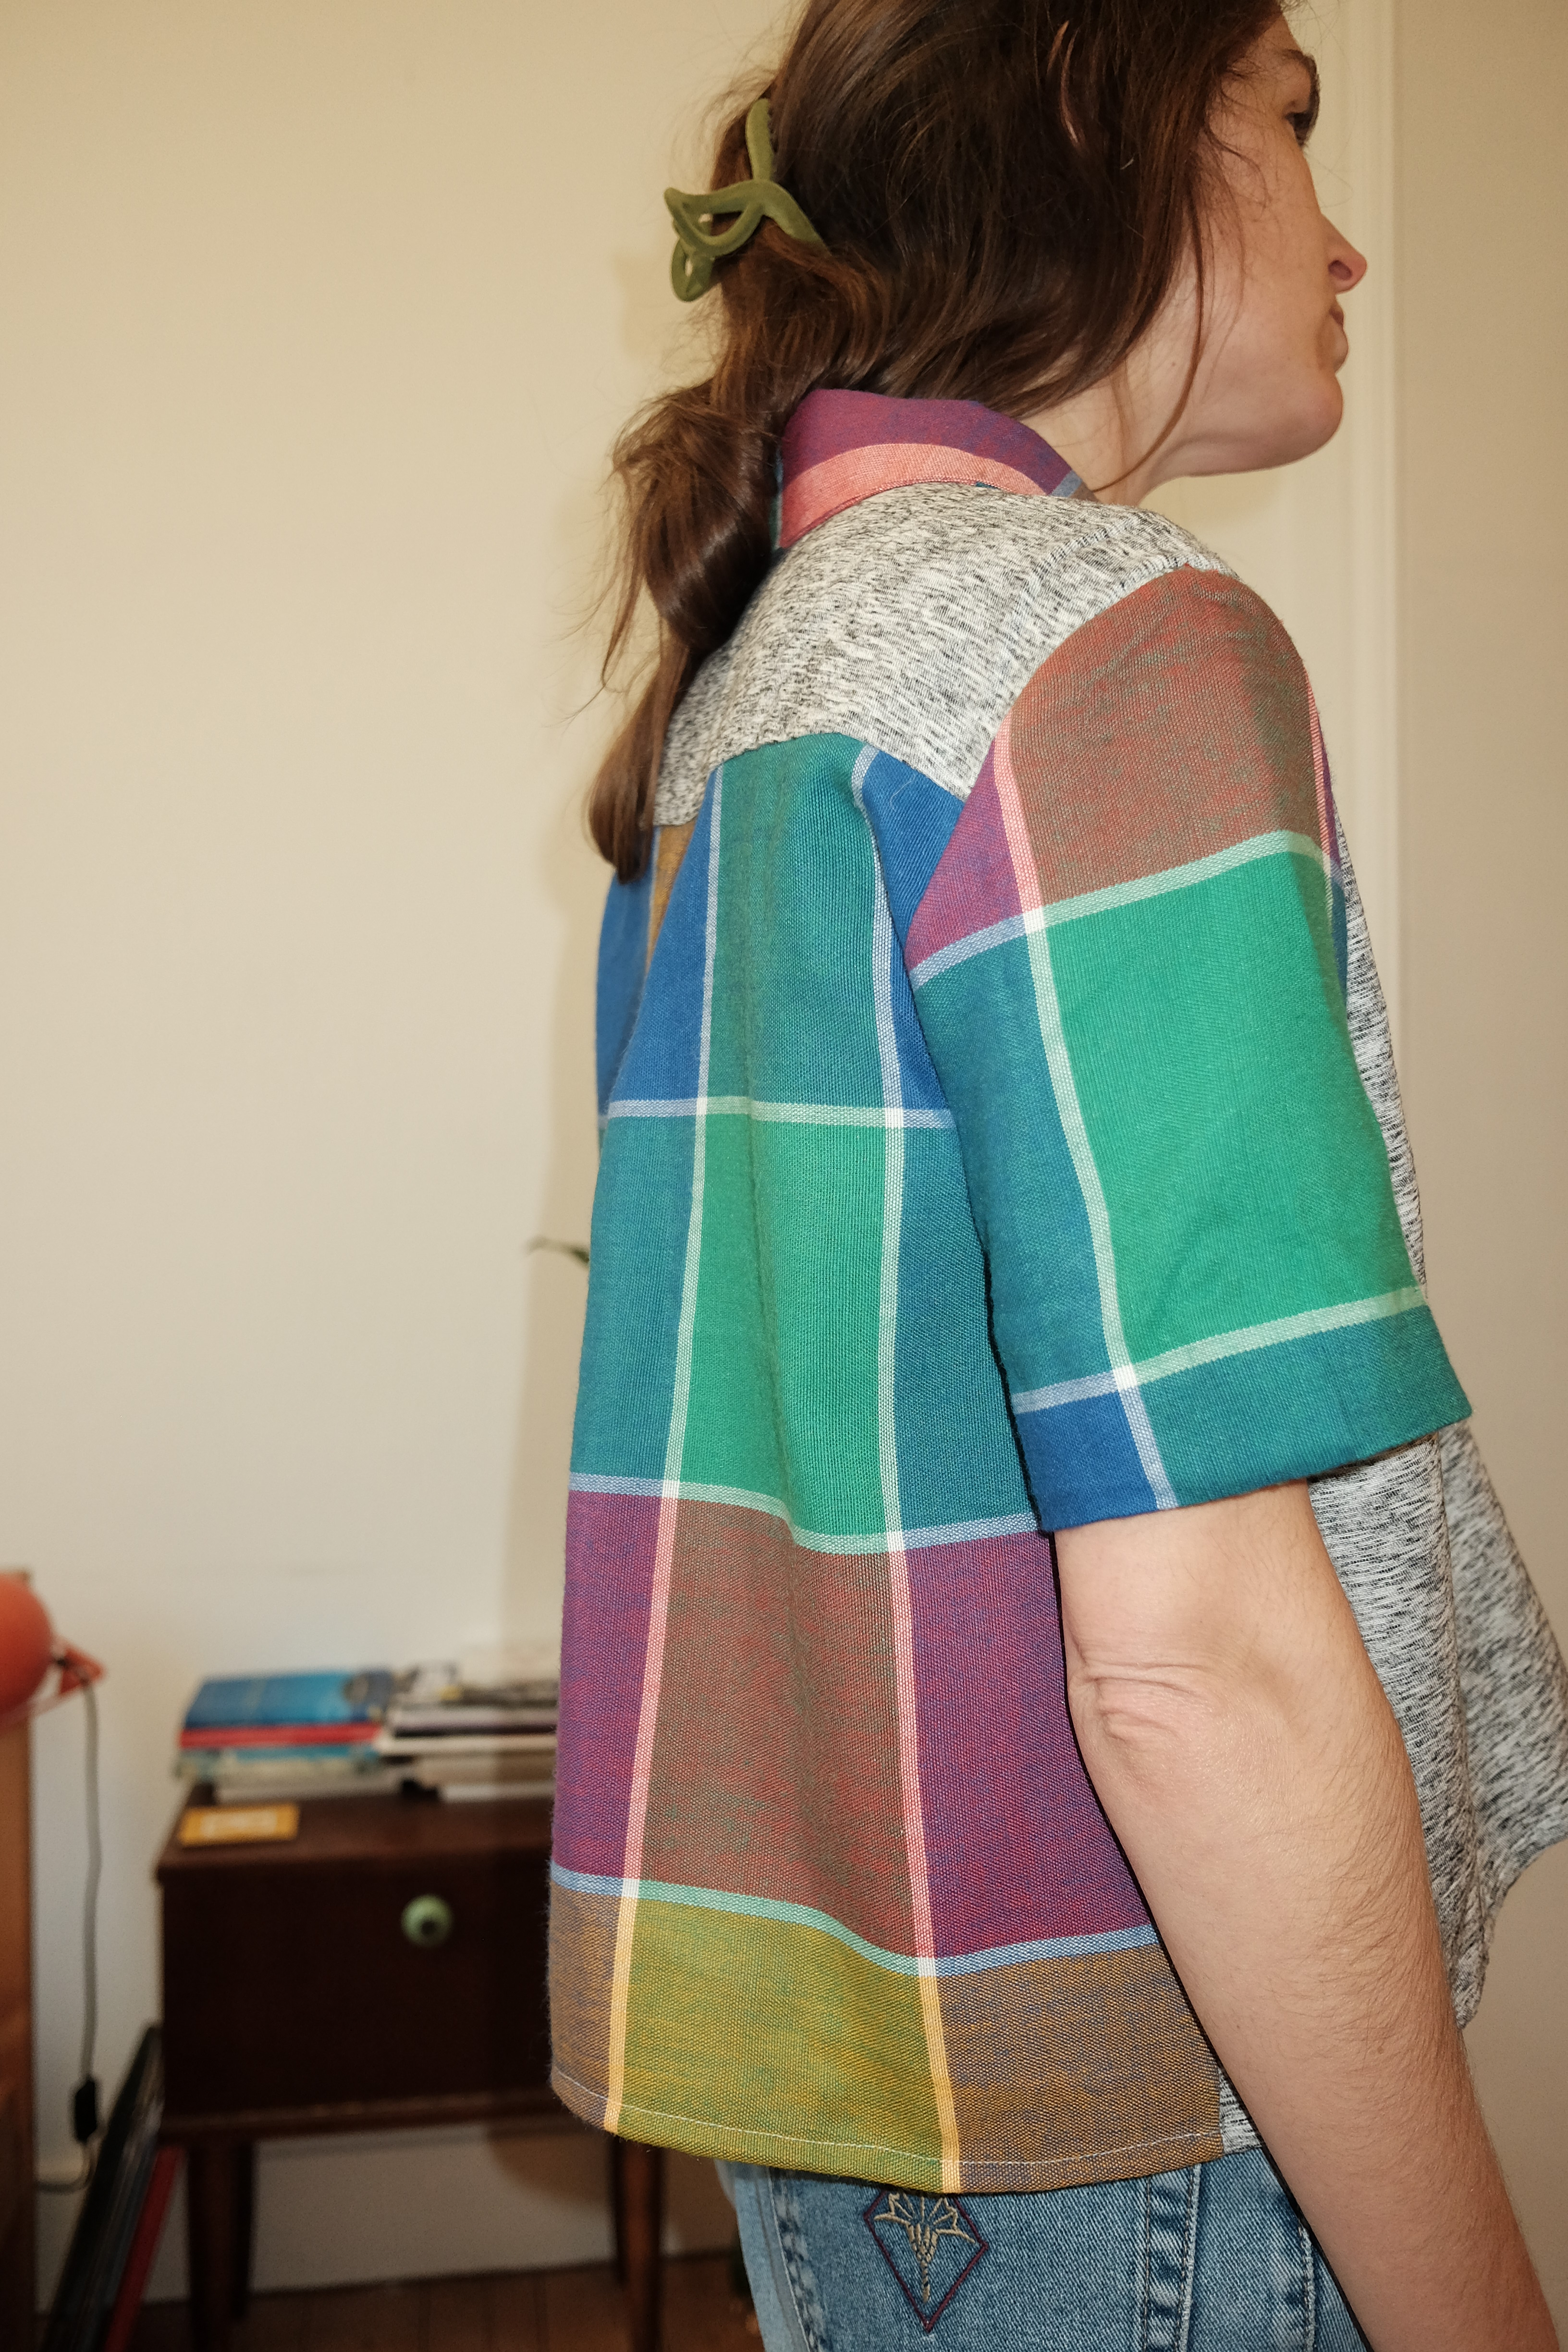
Sharing my latest make, hot off the sewing machine! I found this fabric in the fleamarket a few months ago and thought it would be perfect for a shirt. It is a green cotton with a black and white embroidered grid detail. I used the Classic Shirt pattern from the Modern Sewing Company. This is my second make from that pattern (see my last post for my first version).
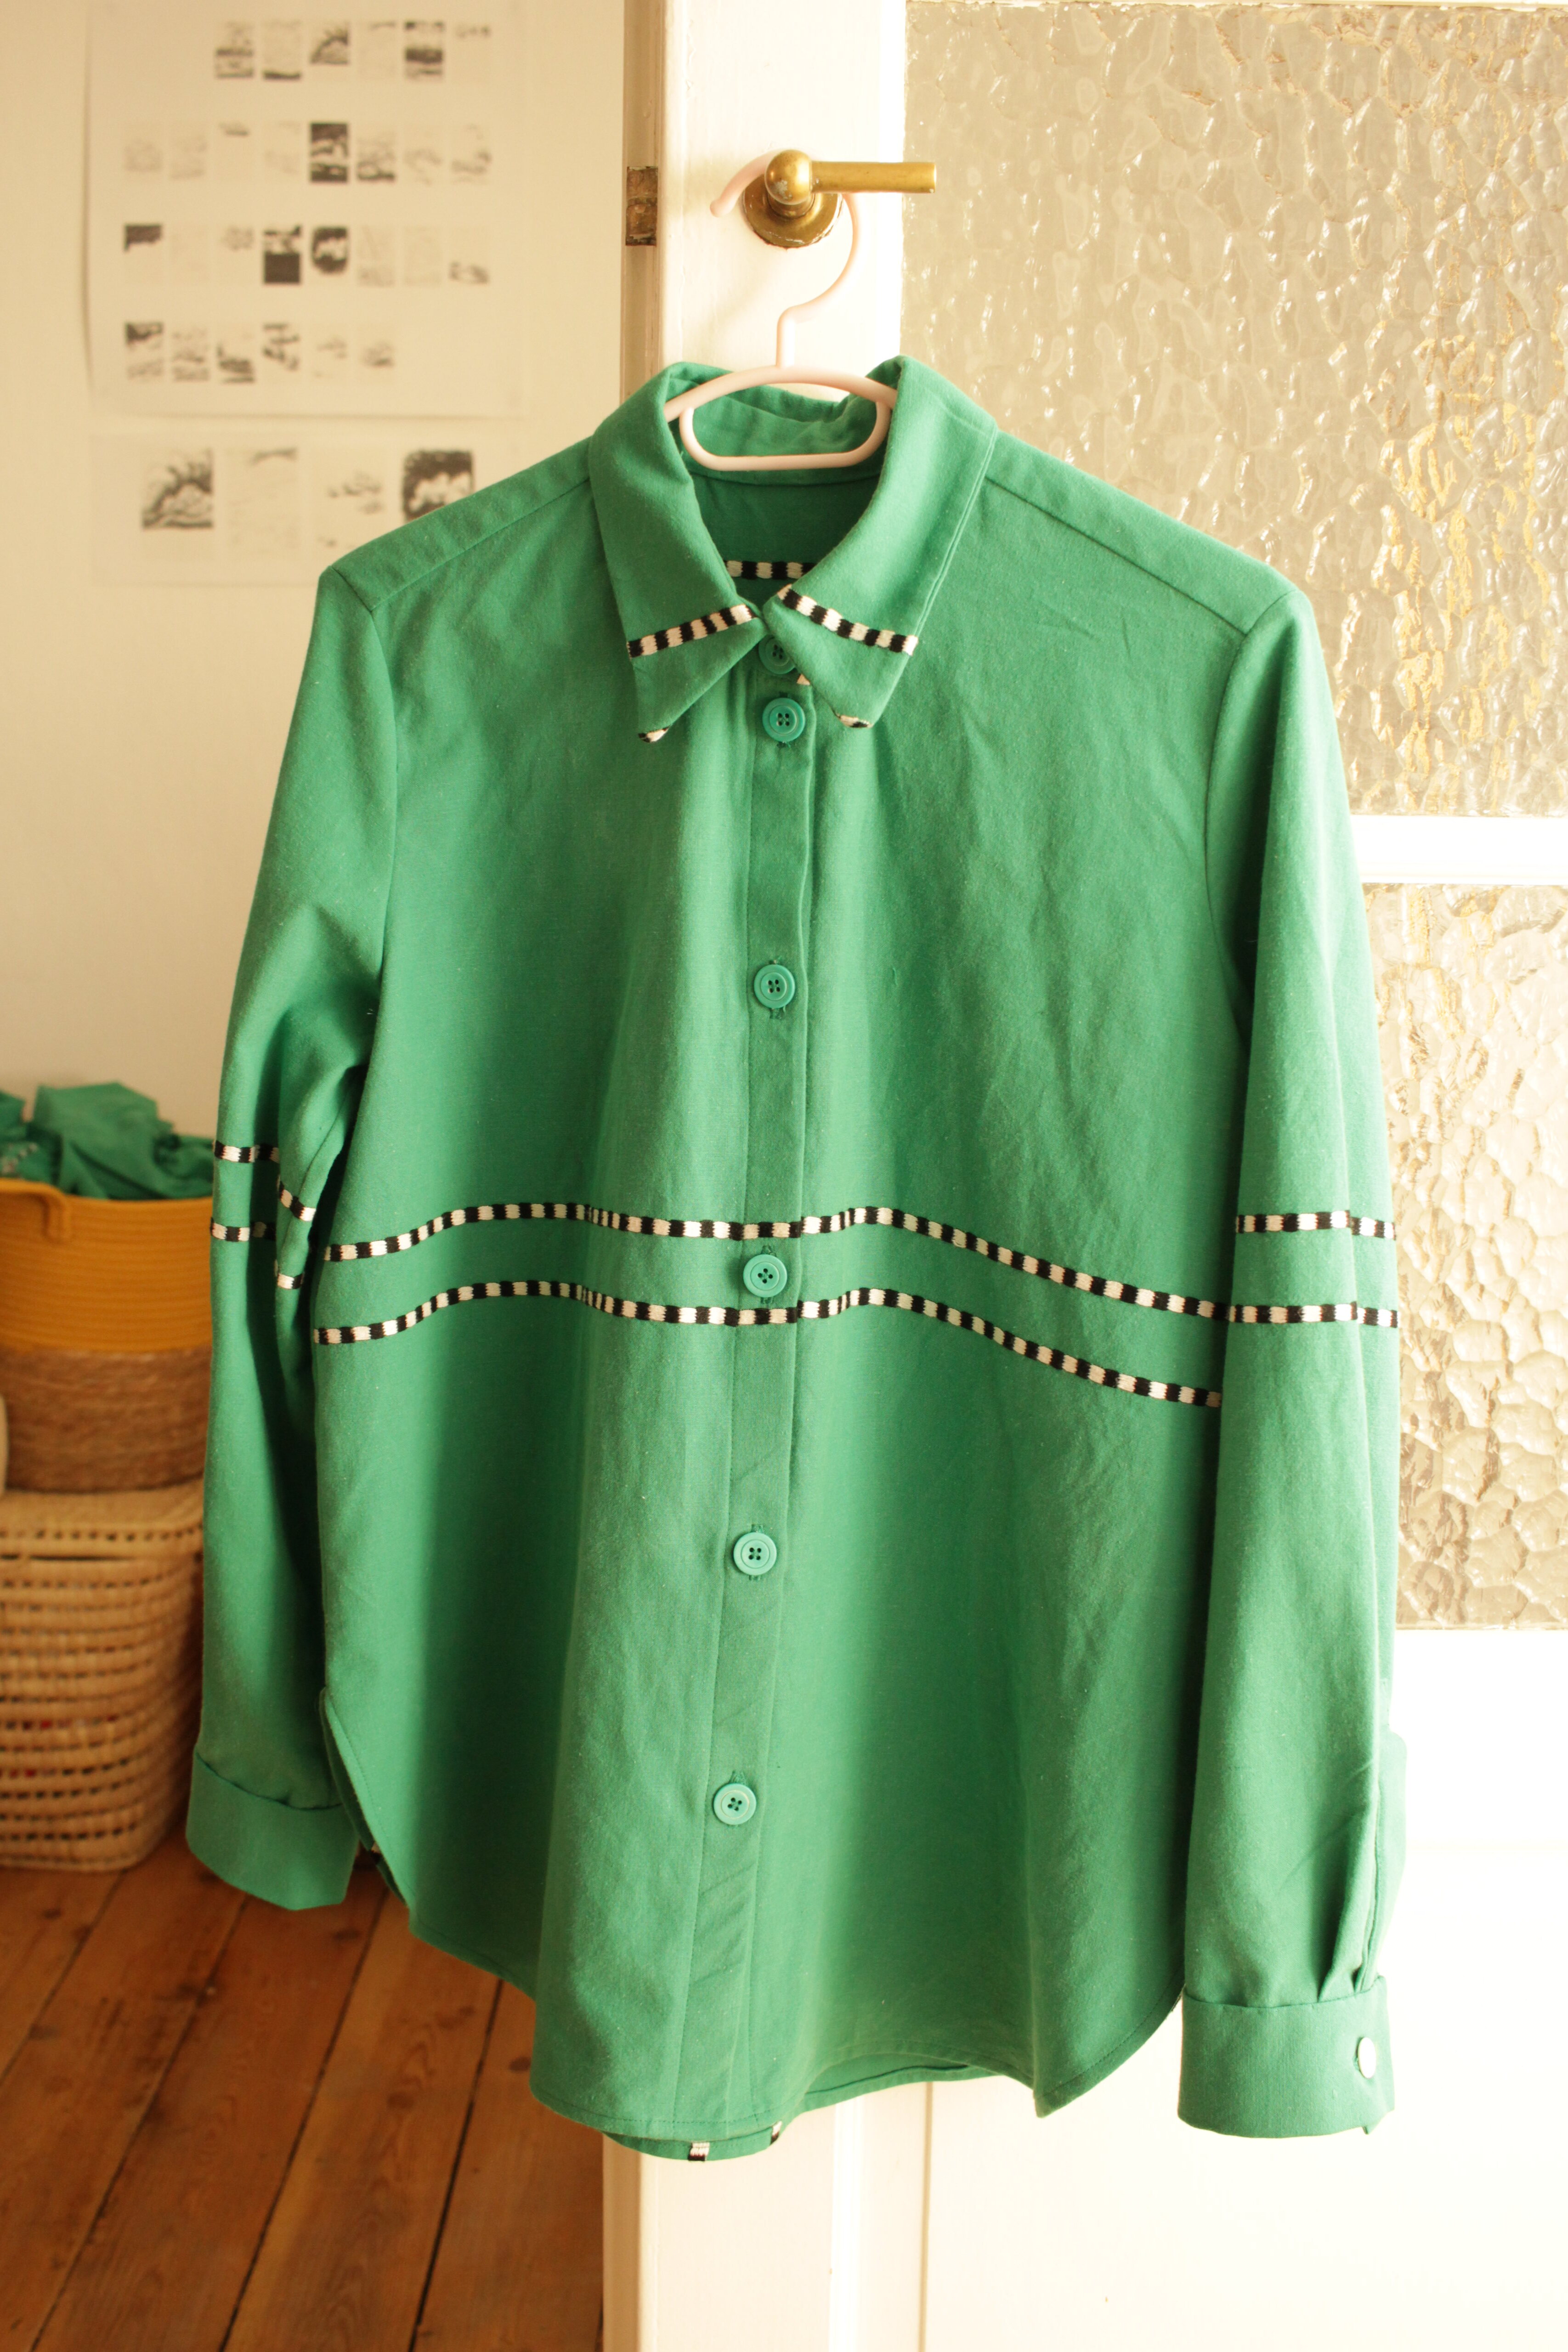
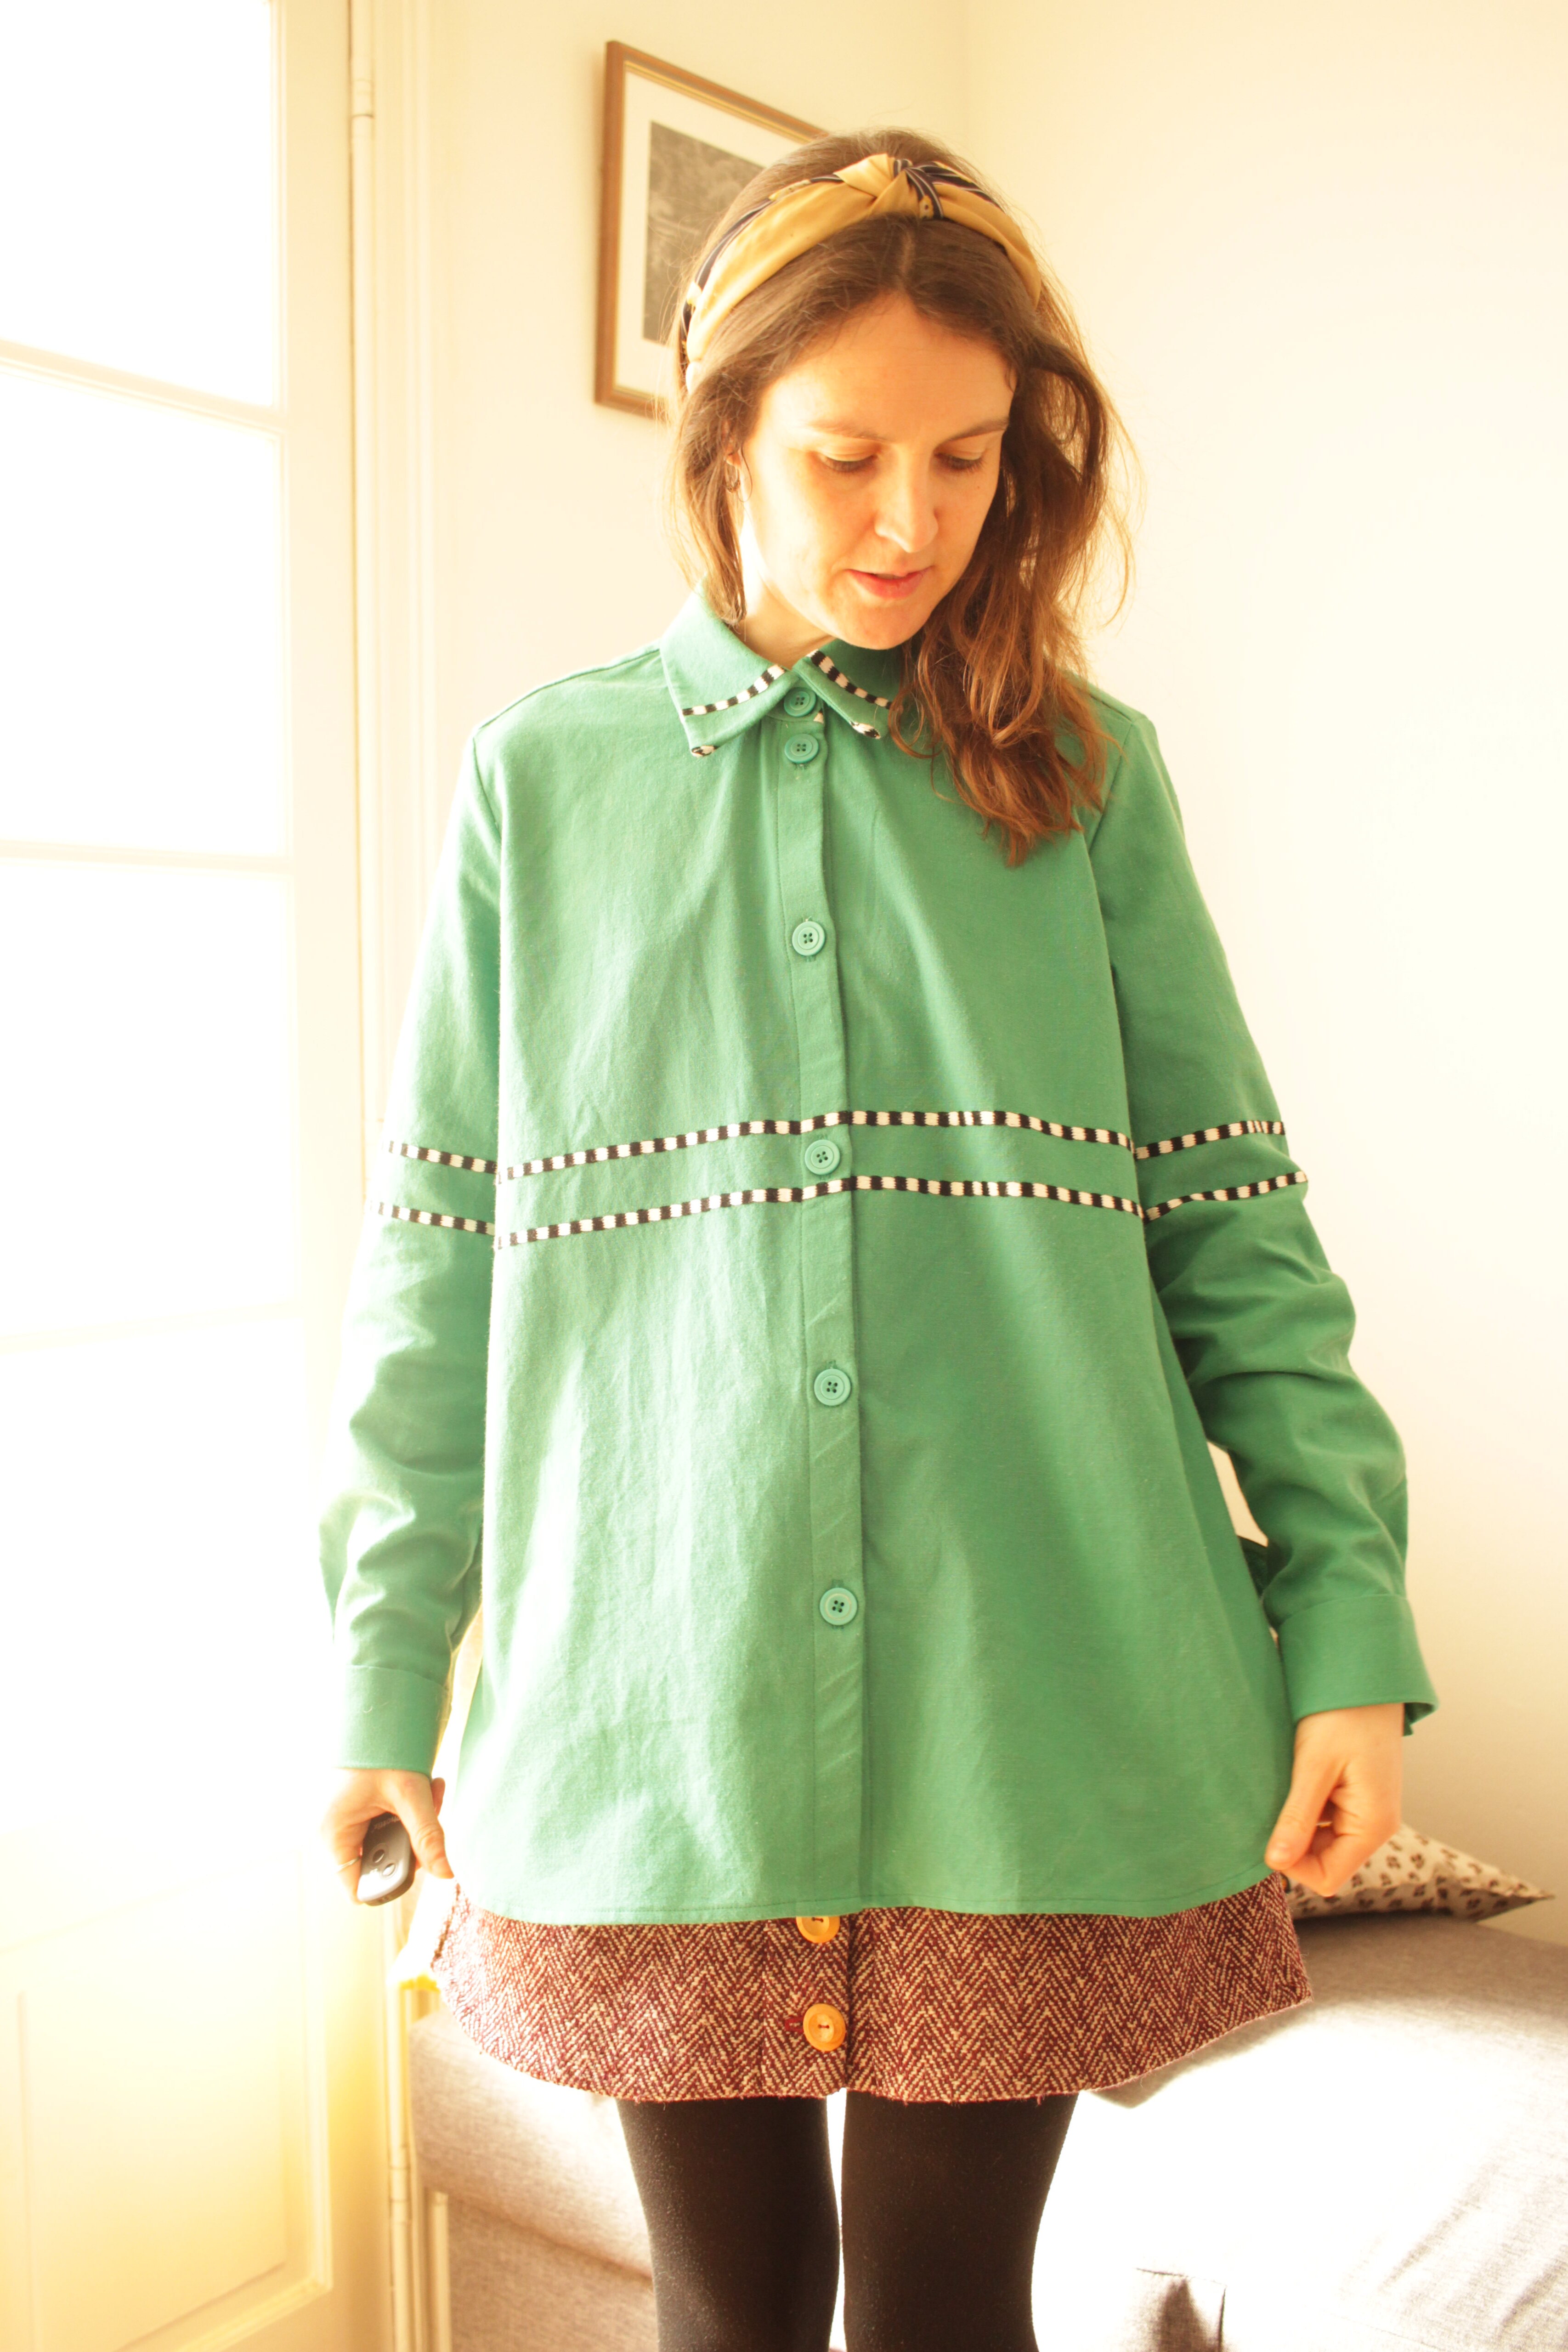
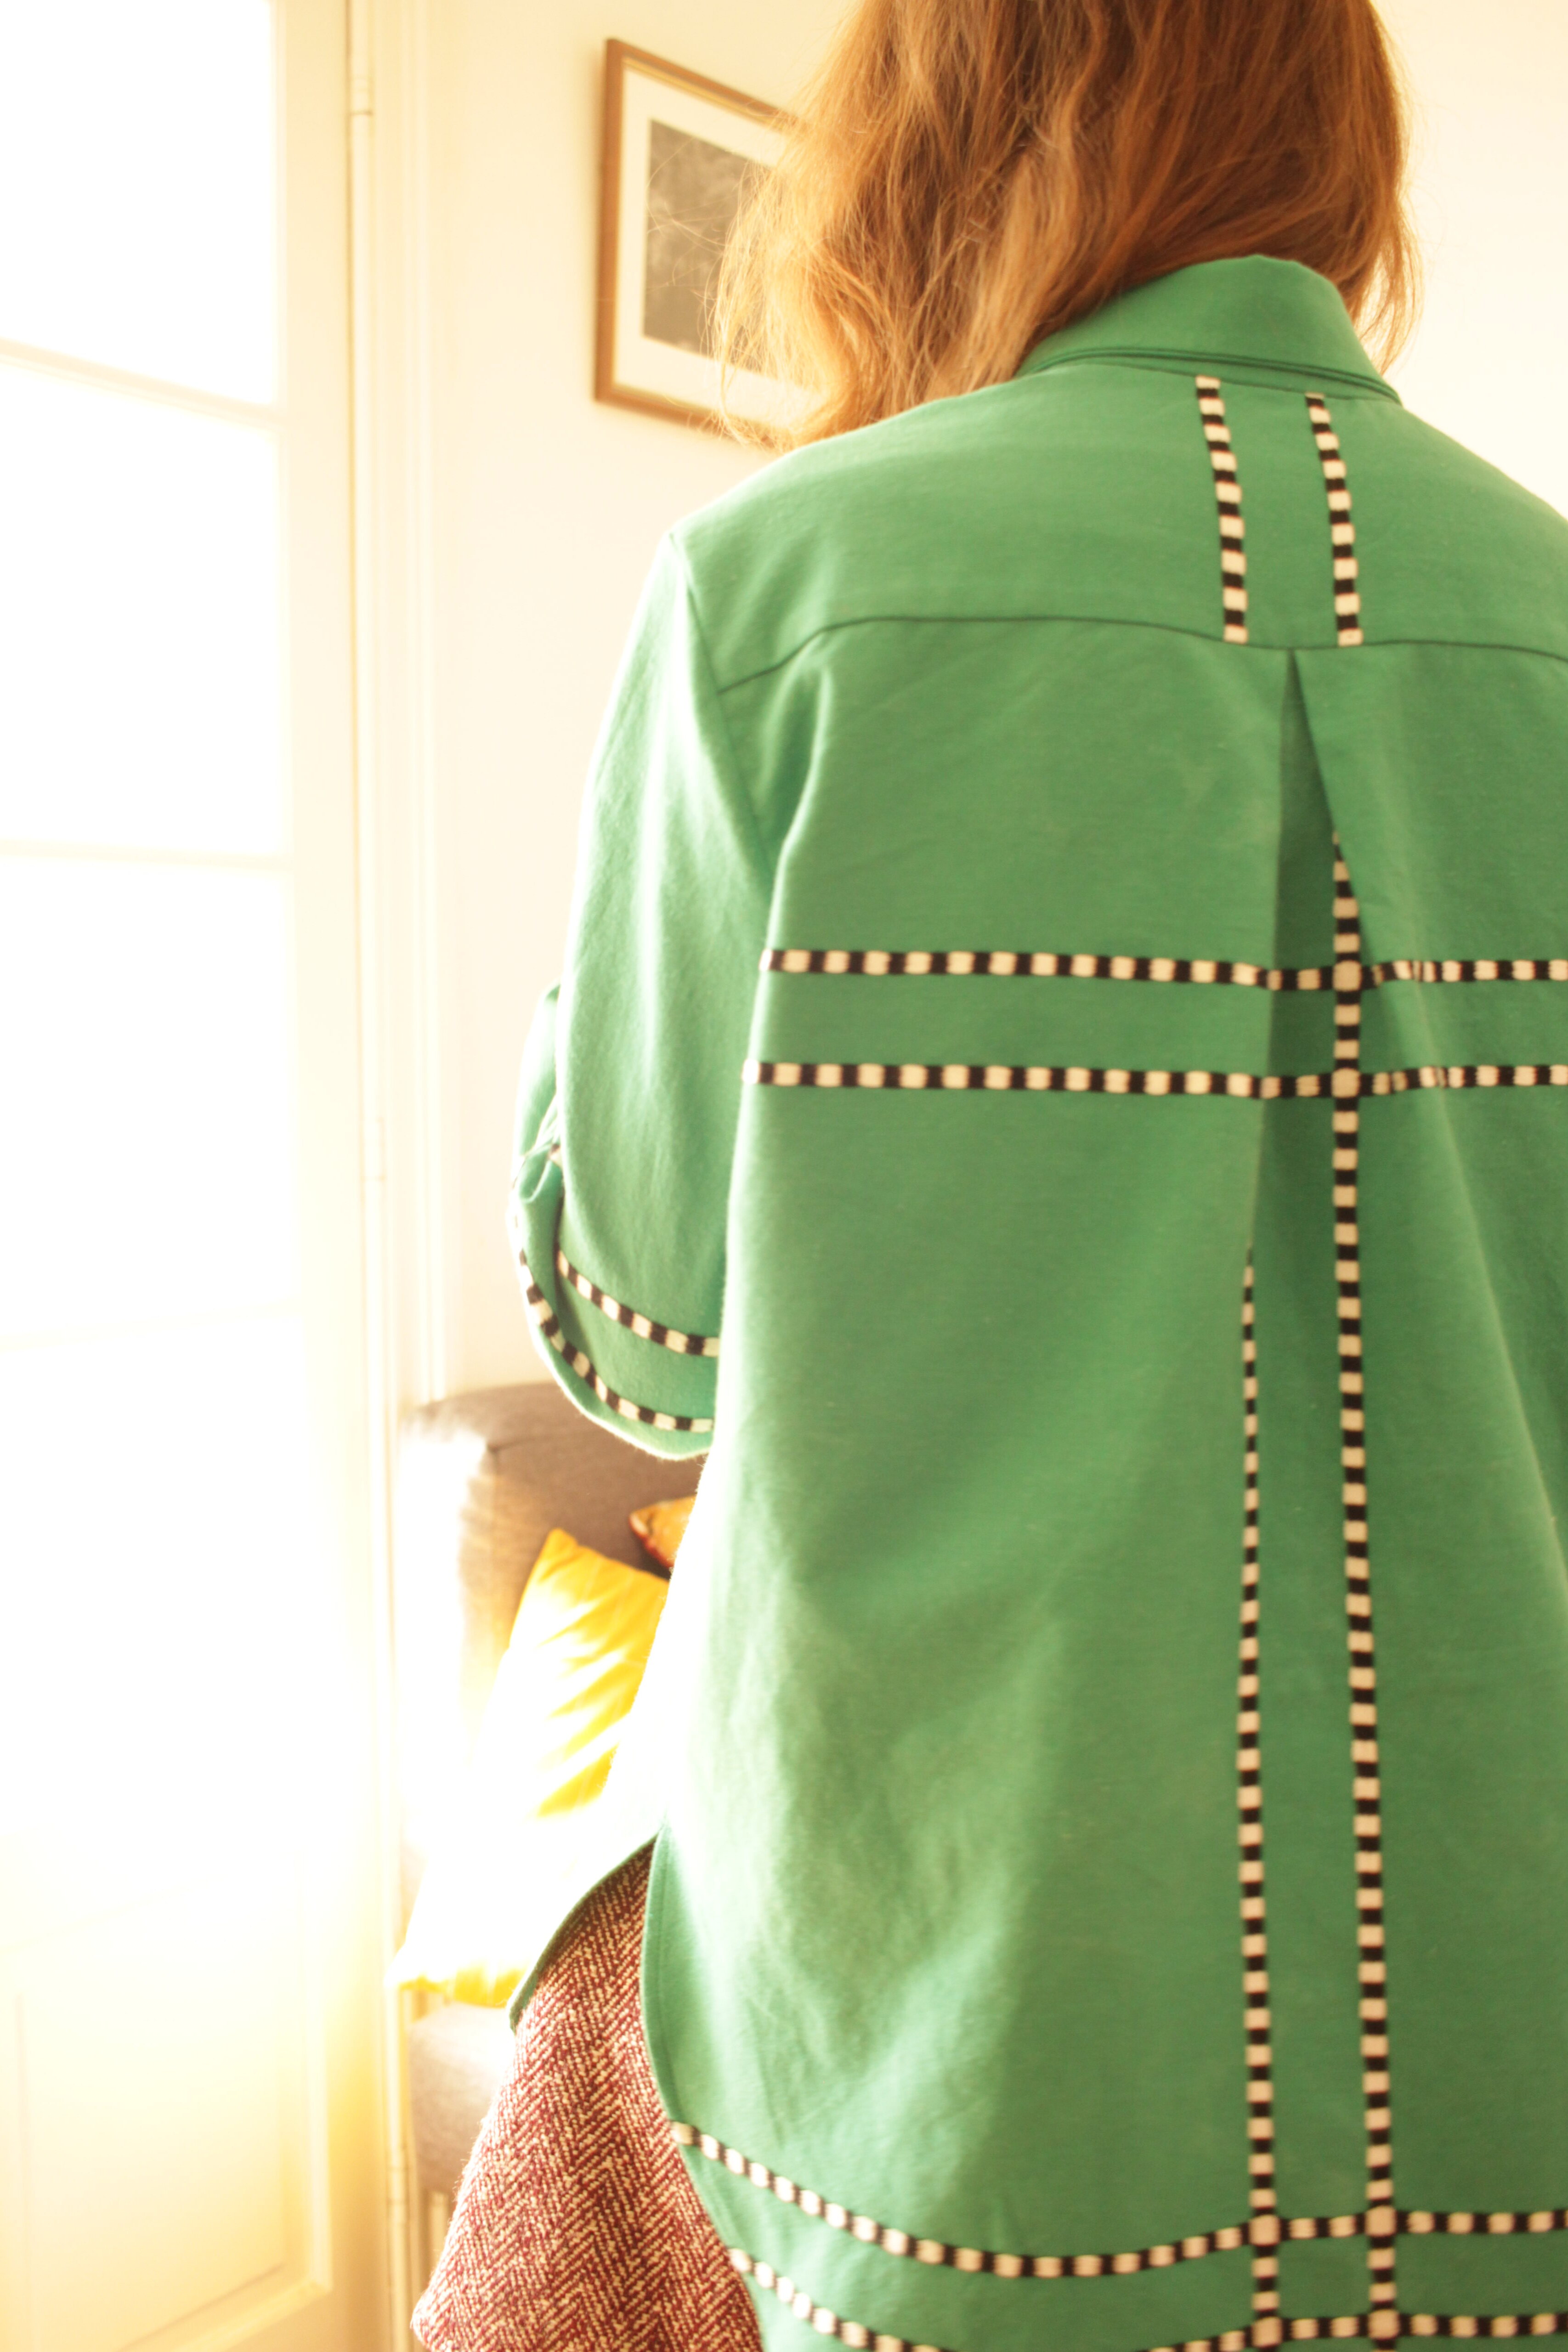
I really enjoyed playing around with the pattern placement on the fabric to decide where I wanted the stripe detailing to sit, and I'm really happy with how it looks on the collar and the continuation across the front onto the arms.

Sewing the sleeve plackets was a nice adventure and I had not done anything like that in a while so it was a good challenge. The instructions advise you to interface the whole placket piece, next time I will just interface the 'middle' part and not the whole piece as I think it is a bit bulky.

On the front button stand I used green buttons (which came from my neighbour's secret attic button stash - no joke - I found out he has a lifetime's supply of buttons and thread in the attic, which have unfortunately since been given away to a friend of his, but I did get to stock up a bit first before the boxes were taken away!). I didn't have enough of the green buttons so I used white ones on the cuffs.

I like that it feels oversized and comfy but it still feels like it fits me. As you can see in the pictures, it looks quite different whether tucked in or out. Can't wait to wear it out and about!


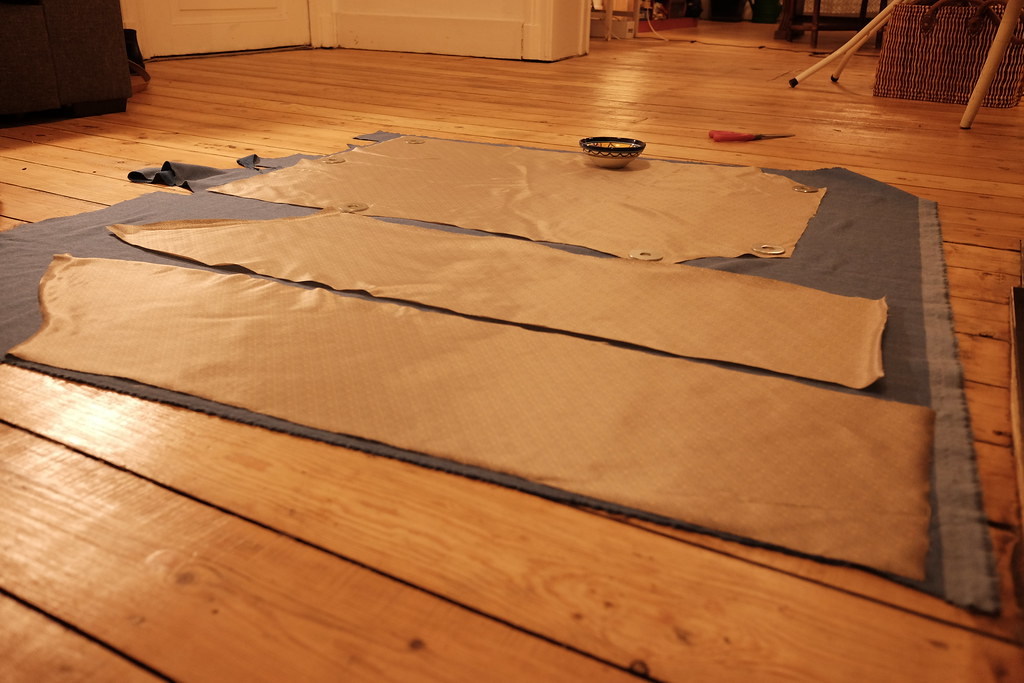
Bonus shot of the burrito method mid-construction!

3.2.23
A classic shirt to cleanse the sewing palate

I didn’t get round to posting about sewing in 2022, and now it's 2023! It's hard to believe that it will soon be a decade since I started this little blog and that I've been feeding my corner of the internet with posts read mostly by my Mum ever since. Blogging is pretty retro these days, and it's easy to be nostalgic for the early days of the 'blogosphere' and lament the way social media killed it off, but nothing stays the same forever! It makes me happy to look back at the early posts on my blog and see how excited younger me was about sewing and writing about it. It's nice to have an archive of sewing projects that remind you both of the project itself as well as what was happening in your life at that time, both good and bad.
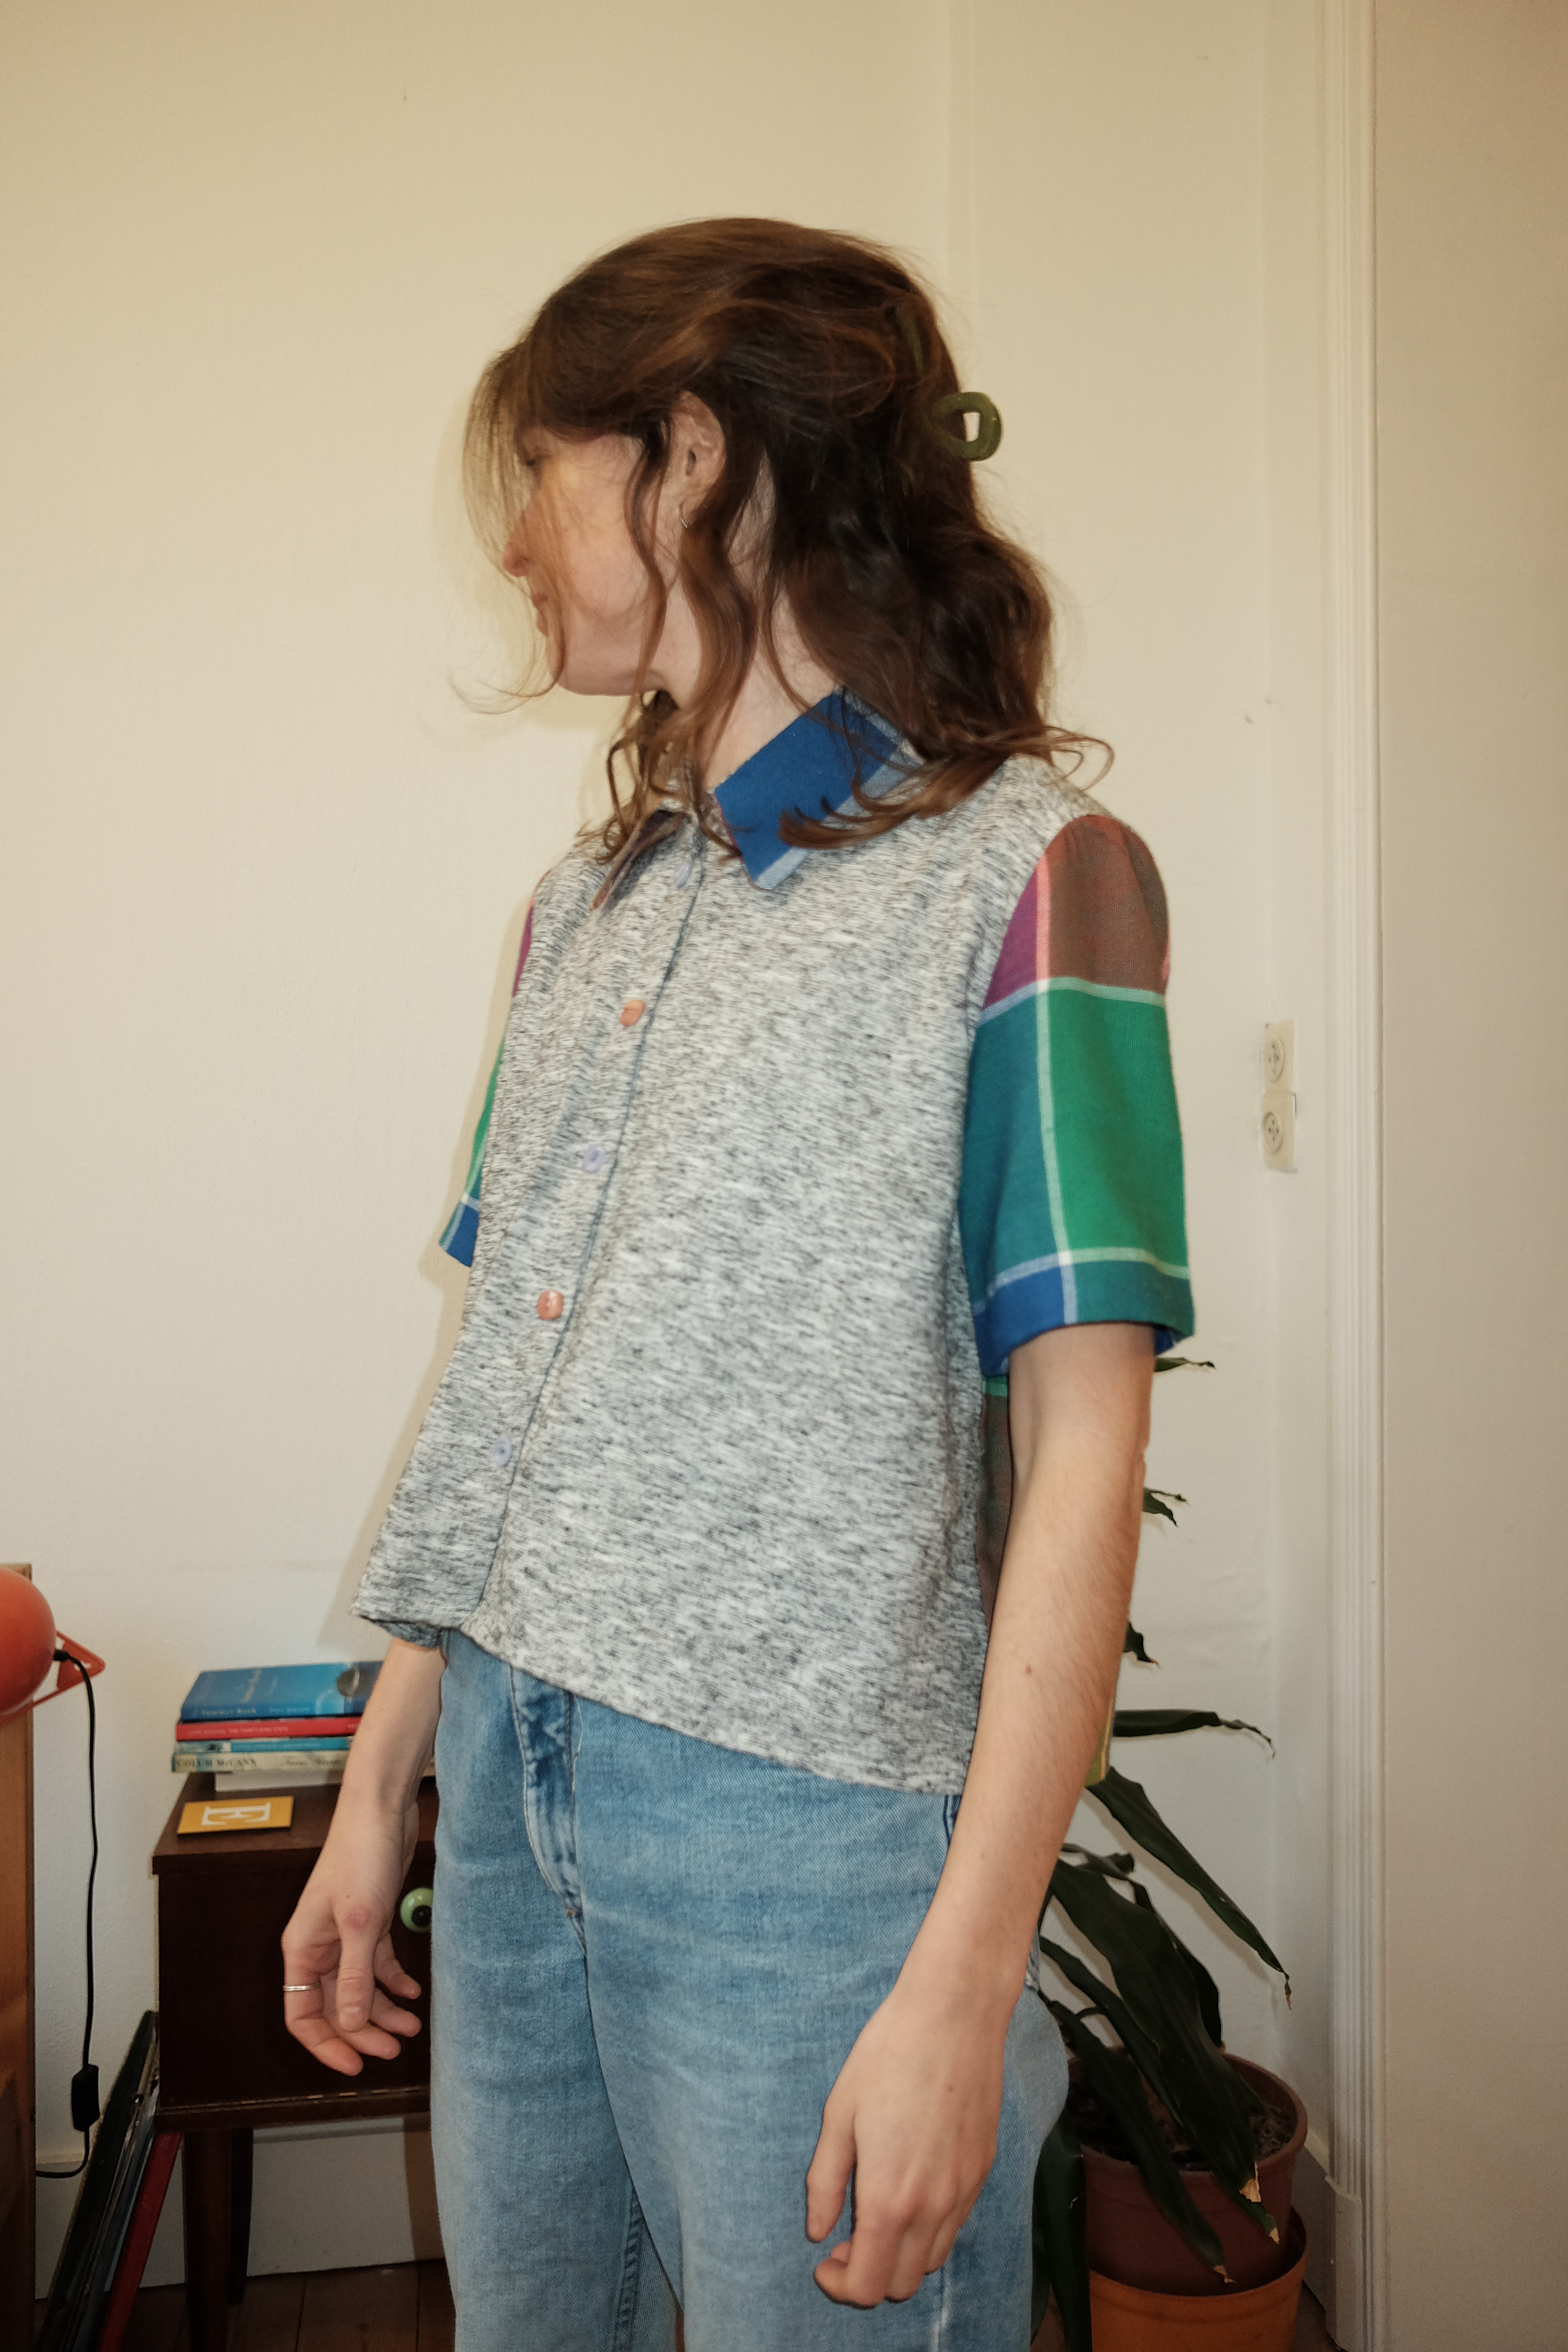
But, regardons vers l'avenir ! It's time to catch up on some recent projects, starting with this shirt I made at the end of 2022. I recently discovered the Modern Sewing Company and I was immediately drawn to their patterns, in particular the Classic Shirt pattern as I had been in the market for a new shirt pattern for a while. 10 years ago if you were sewing and active on the internet then you probably knew all the main indie pattern companies. Nowadays I’m always discovering an endless amount of new (to me) companies and I think it would be impossible to sew your way through everything on offer! It’s amazing to see how the home sewing industry has grown over the last decade.
And the Classic Shirt pattern didn’t disappoint! I made a cropped version with short sleeves to test out the fit and I love wearing it so much, looking forward to warmer days to get more wear out of it.
I’ve made several shirts before, both from patterns I've bought and some self-drafted attempts, but it was really nice to just start from scratch and follow the well-written instructions for a new pattern. The fit is really great and I can’t wait to make more versions.


28.12.21
Dream coat
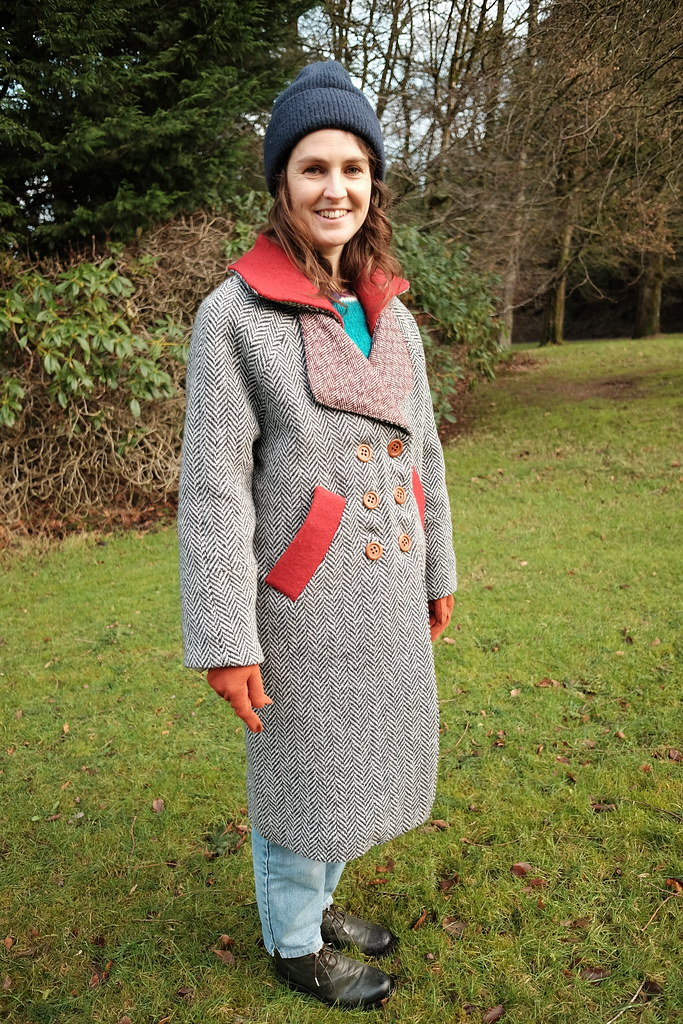
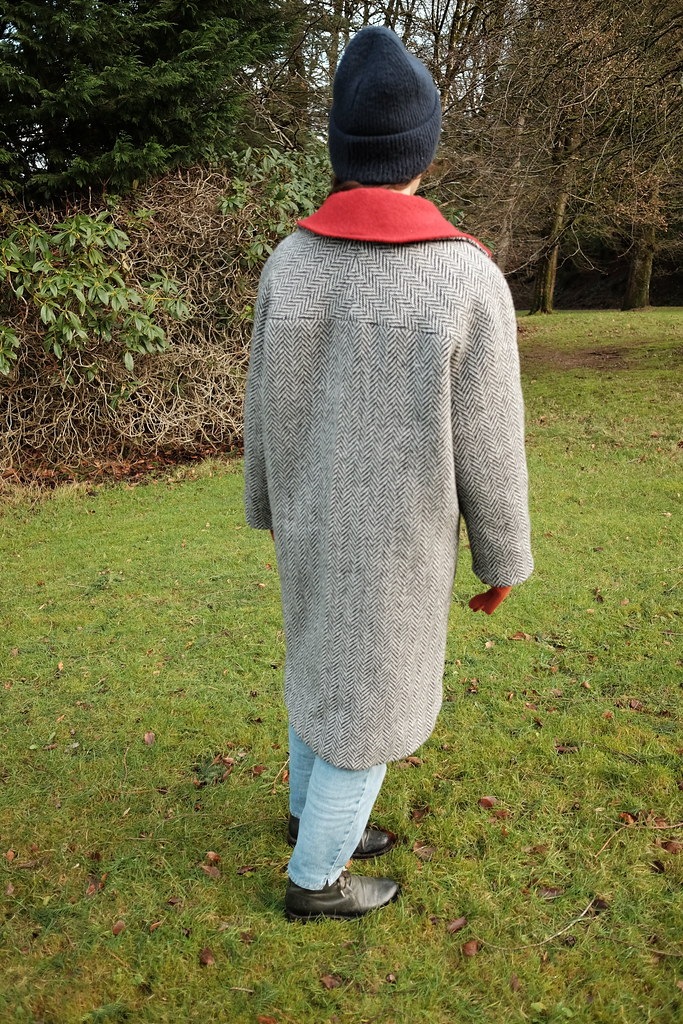
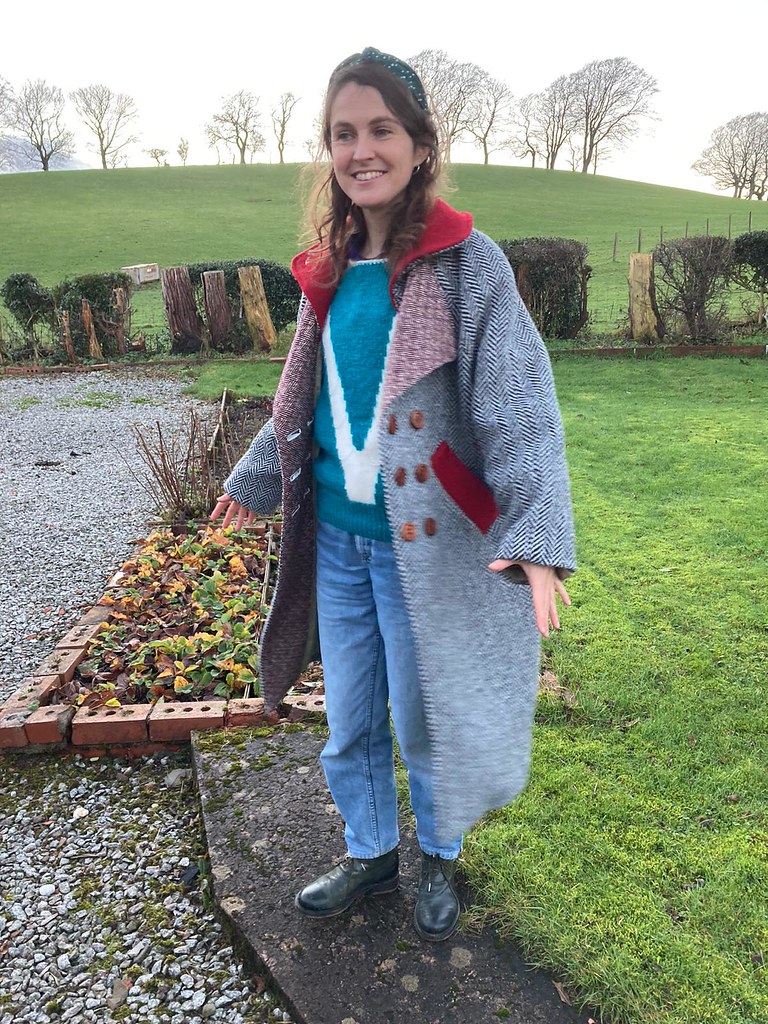

Finishing off 2021 to report on a very involved project that I worked on a little bit each day over several weeks – I made my dream coat! I have learnt loads making it and I’m really quite proud of it (as anyone who has spoken to me recently will have heard!). It brightens up a grey day, is comfortable, warm, has plenty of room for wearing a jumper with it, has pockets, and I can even cycle in it. I’ve got a lot to say about making this so read on to find out more. Apart from some little things here and there that could be neater, overall, I’m really pleased with the finish.
The pattern
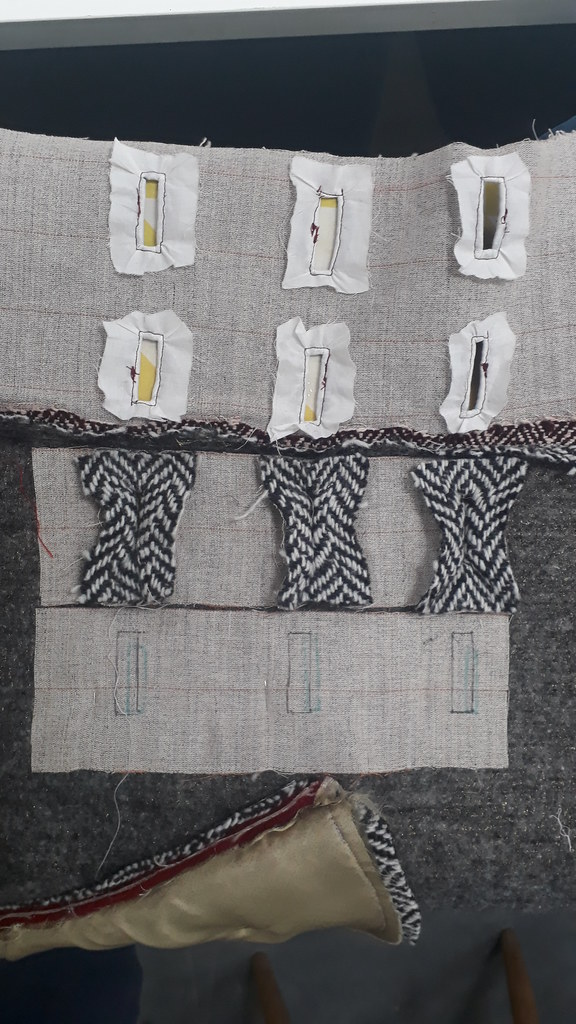
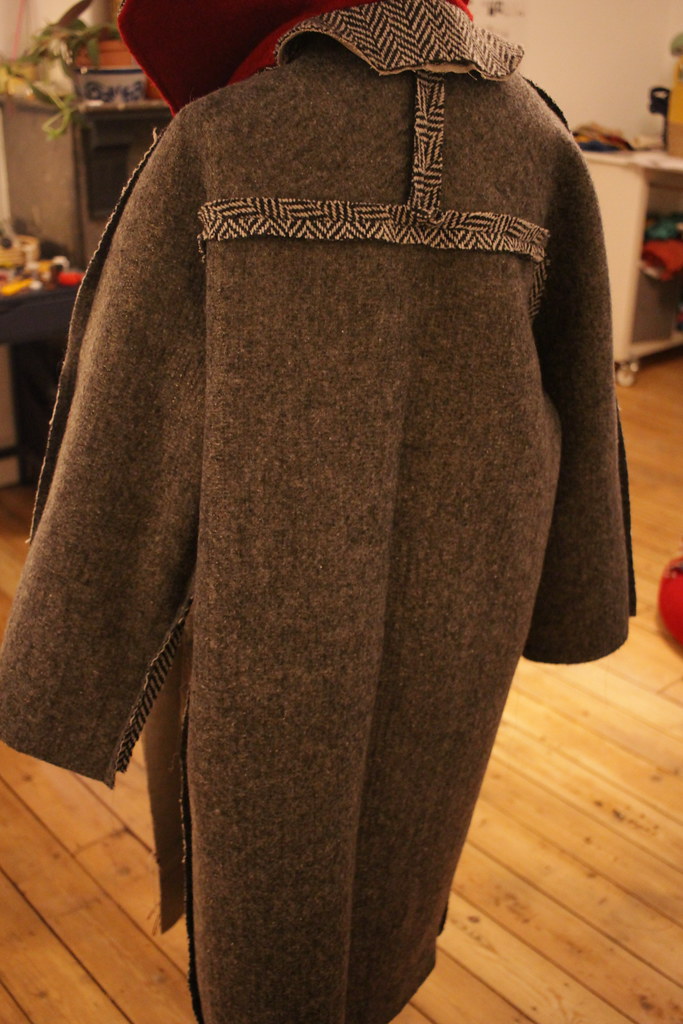
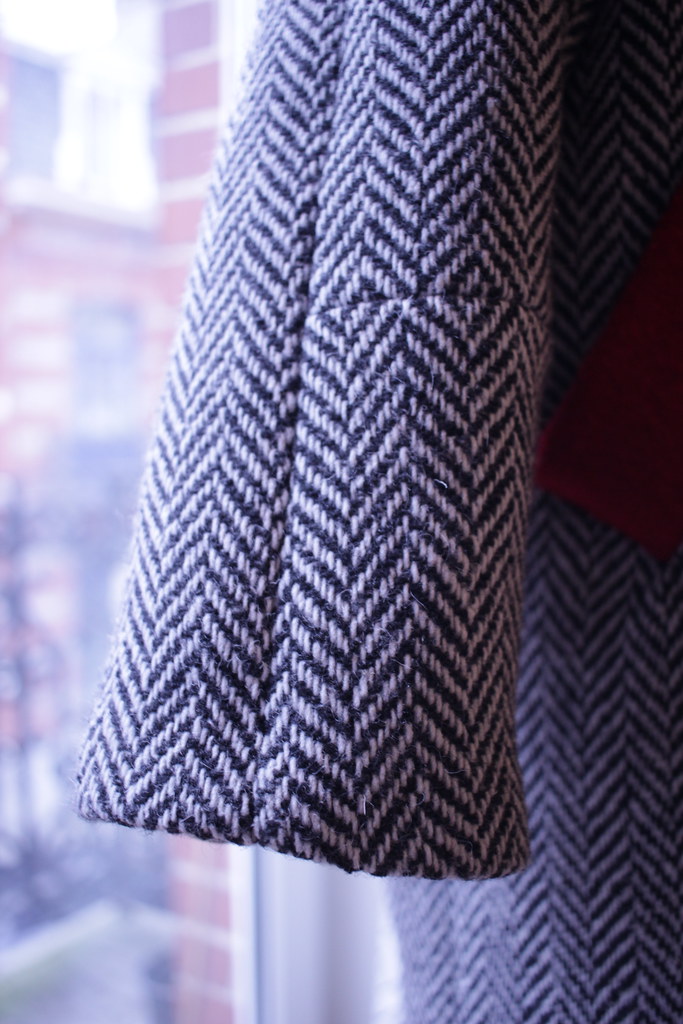
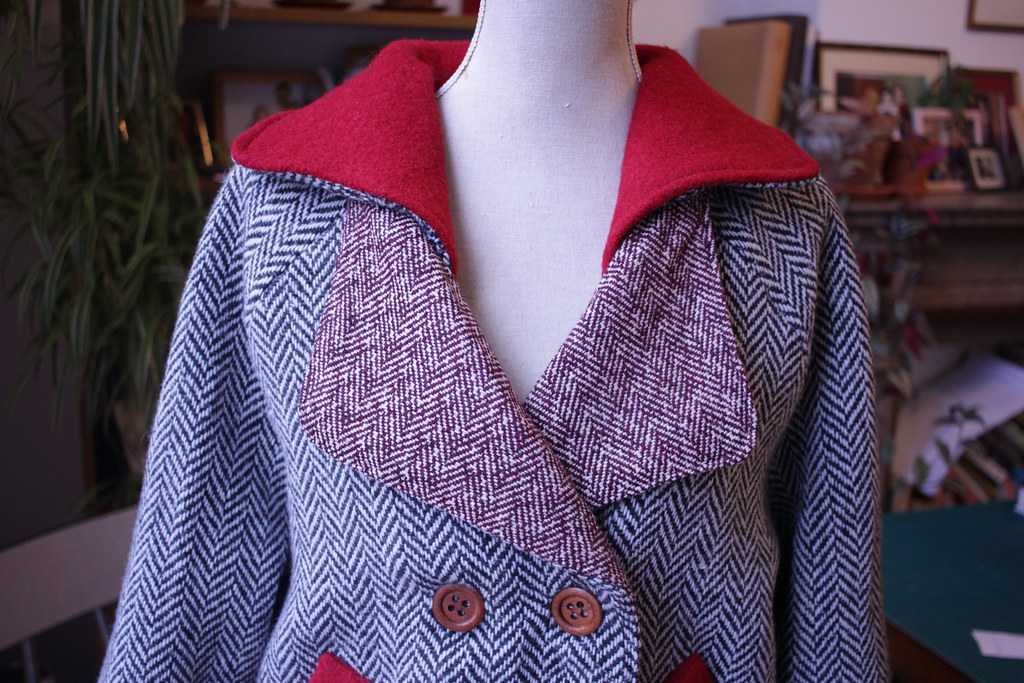
The pattern I used was from issue 216 of Burda from December 2017 (pattern number 109 on page 8, and available online). I was looking through the magazine and was drawn to the pattern for the deep raglan shoulders and the collar style. I modified it slightly by not doing the sleeve cuffs the way the pattern suggested and I followed the first method for doing the hem in this amazing Youtube video on sewing a lined jacket corner. I also moved the welt pockets (which was a slight mistake as I had to make the pocket bags smaller as they were overlapping with the buttonhole area!).

The fabric choices
Main fabric
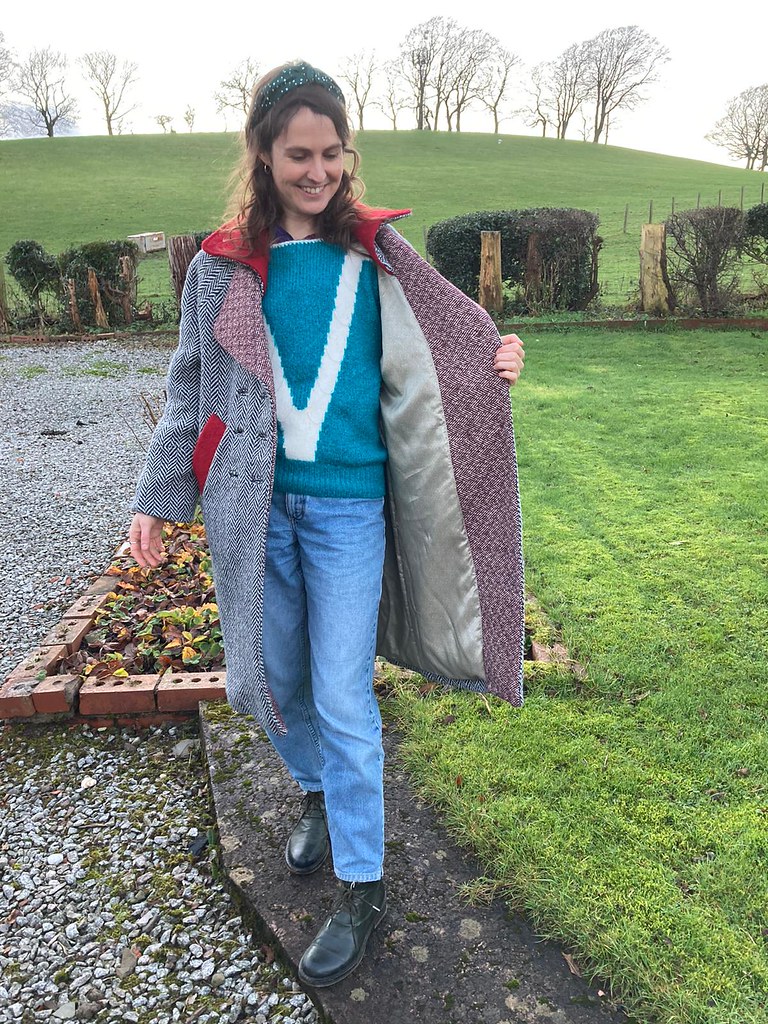
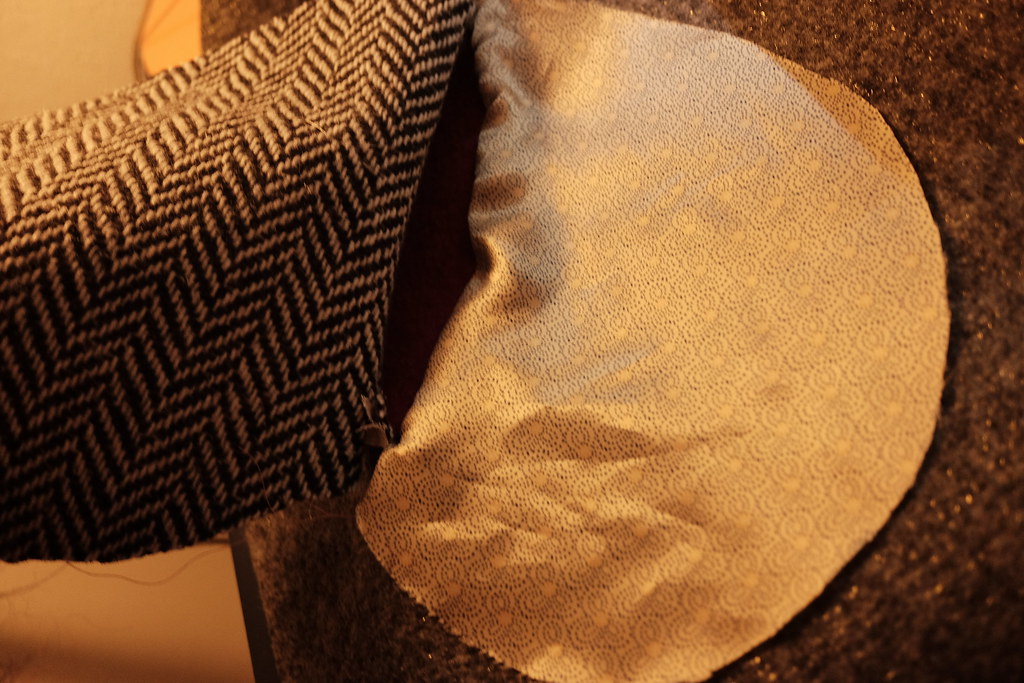
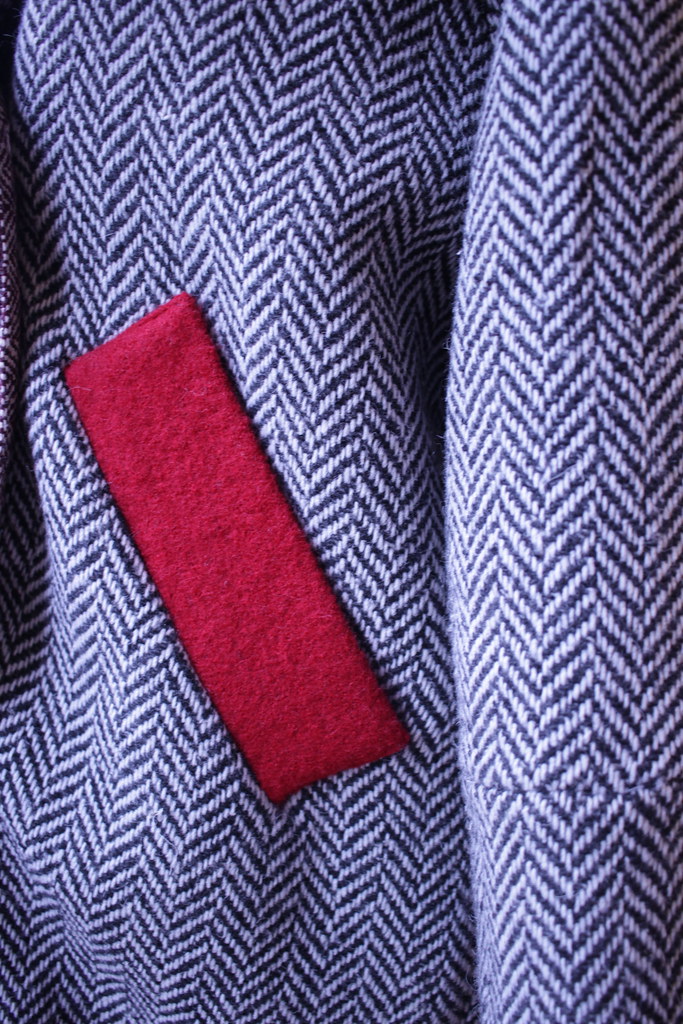
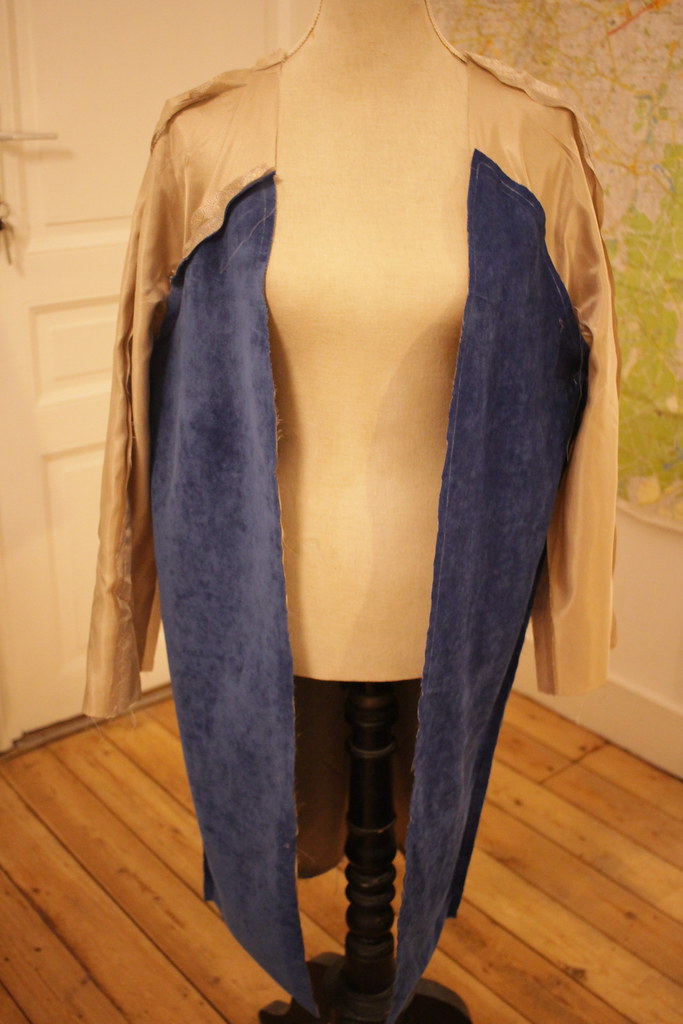
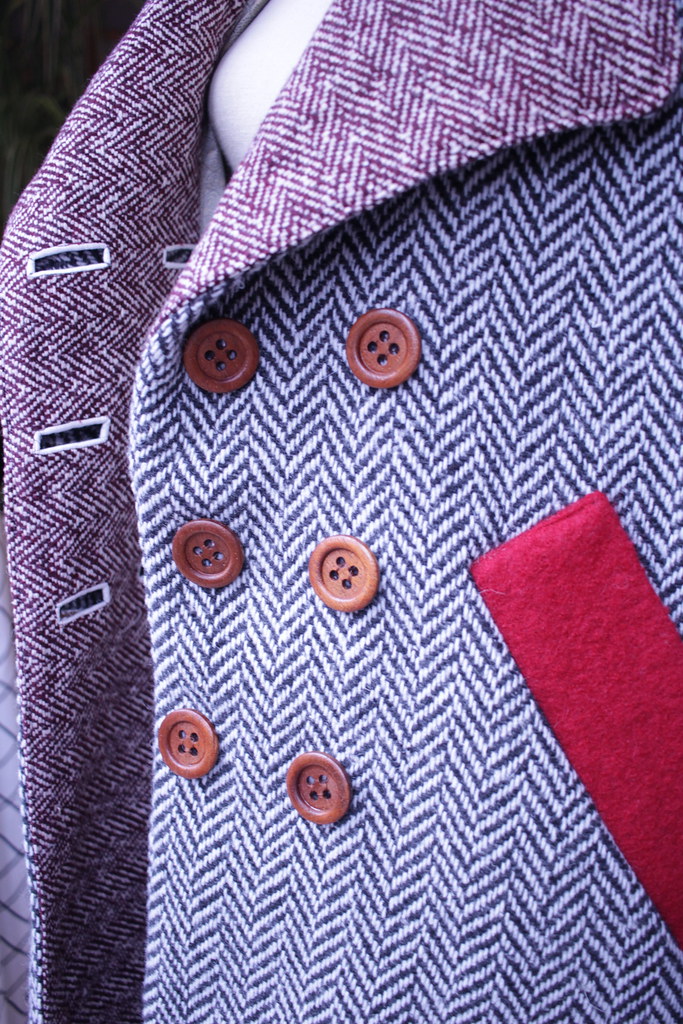
I bought this Herringbone wool fabric from Passion Tissus in Saint-Gilles, but I didn’t have enough to do the whole coat in it, which was actually a blessing in disguise. At first I wanted to use all of the red fabric for the collar pieces but I also did not have enough of that either as I just had a few bits leftover from a previous project. So in the end I chose to use a third fabric for the front facings (i.e. the lower lapels), this was leftover fabric I previously used to make this skirt in 2016.
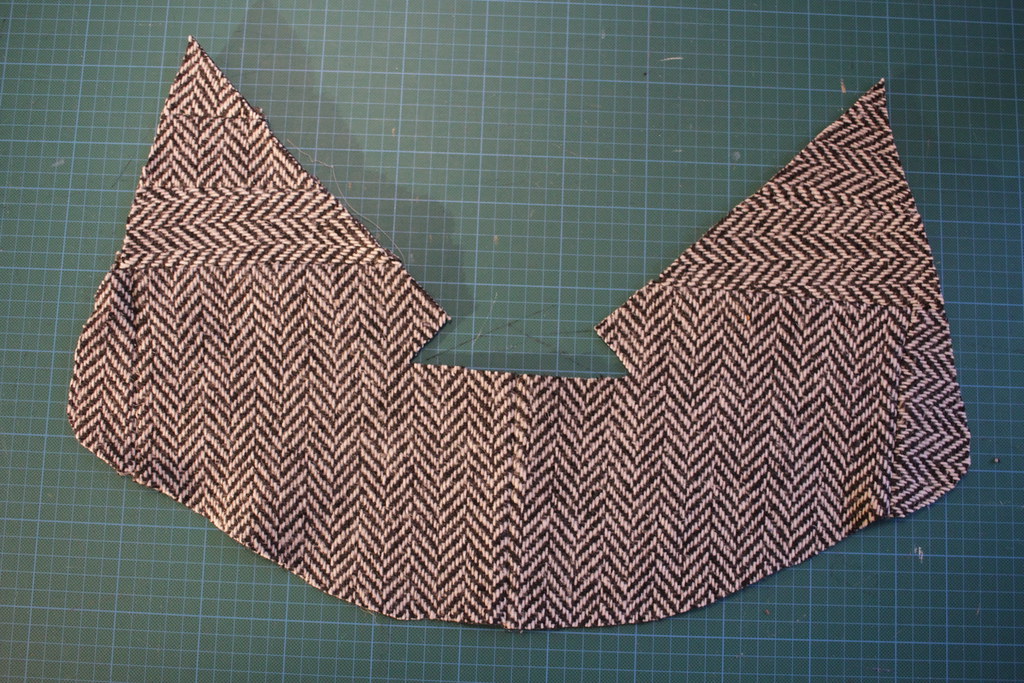
I also had to patchwork small pieces of the Herringbone fabric to make the undercollar! So to say I used every last scrap of the fabric is no exaggeration!

I think the combination of the three fabrics and the wooden buttons works really well! I interfaced (interfacing in French = entoilage) the front facing, welt pockets, and collar with camel hair (poil de chameau) which I bought in a haberdashery near where I live. From previous projects I learnt that it is good to get good and appropriate interfacing for your fabric as it really improves the quality of the finish. Always interested in trying out different materials for interfacing.
Lining and Interlining
The lining fabric is gorgeous (also from Passion Tissus) and I’m so glad I got to use it for this coat. I decided to interline the front and back lining pieces with a blue toweling fabric. I wanted to ensure the coat would be warm so I think this was a good move, I didn’t interline the sleeves as I didn’t want to add too much bulk and also I didn’t have that much of the toweling fabric. I read quite a lot about interlining to prepare for this project and it is quite interesting to think about what fabrics you can use, while you can buy special interlining fabric it seems that flannel or a towel fabric are really good choices, they are light and add warmth which is what you are trying to achieve.

>
The construction
I decided to write out all of the steps involved as there are quite a lot and this will be a good reference for when I’m planning my next coat! I did mostly follow the instruction order in the pattern but the below is my own ‘work flow’ that has extra steps or things in a slightly different order.
1) Trace off pattern (and add seam allowance!) in your size, make any necessary modifications, and make a test version! I made a shorter test version of this coat which turned out quite nice too. I’ve not taken any pictures of it yet but will share at some point too.
2) Cutting, interfacing and interlining
- Cut out all pieces in coat self fabric, lining fabric, interlining and interfacing.
- Interface front facing, welts, back facing, and upper collar.
- Interline front and back lining pieces.

3) Preparing coat front
- Sew welt pockets. There are loads of tutorials online but I just followed the Burda method which I found relatively simple.


- Join front facing to (side) coat front (don’t sew all the way to top and bottom, but enough so that the area where the buttons will be is joined.
- Do the bound button holes on right side of coat front.


4) Preparing collar
- Join upper collar to back facing – this was quite tricky to get right so do a practice on some scrap fabric to make sure you get a neat finish – and set aside.

5) Sew coat
- Sew back sleeves together at centre back seam then attach to back piece.
- Sew front sleeves to coat front pieces.
- Sew front and back sleeves together.
- Sew side seams
6) Sew lining
- Sew back sleeves together at centre back seam then attach to back piece.
- Sew front sleeves to coat front pieces.
- Sew front and back sleeves together.
- Sew side seams.
- Set aside.

7) Attaching collar to coat
- Sew front facings all the way up.
- Attach under collar to back neckline.
- Sew upper collar to under collar right sides together, leaving the inner seam that will join front facing open. Turn right side out. Sew open seams of collar to front facing
- Stitch to secure shoulder seam to the collar seam.

8) Join lining and coat
Sew lining and coat together right sides facing, joining the lining to the coat facings.
9) Hem and bagging the lining
- Fold hem and lining
- Assemble bodice and facing down to lower edge
- Assemble facing with lining to notch
- Self bottom
- Lining with self bottom
- Cuffs
- Bagging the lining: Unpick a 15cm gap in the sleeve lining upper seam, pull coat through. Turn out – celebrate, you are nearly done! Here is a video of me doing this for this coat:
10) Final hand sewing and buttons
- Hand stitch hem vents.
- Hand stitch sleeve lining hole.
- Hand stitch sleeve lining at cuff to hold in place.
- Press hem
- Sew on buttons

Now go forth and live your life in your new coat!
Nothing you make exists in isolation, and this coat would not exist if it had not been for the previous coats I made and learned from (the Yates coat from Grainline Studio in 2020, the Rita raincoat pattern from from Make my Lemonade in 2016, a self-drafted coat in 2015, and the République du Chiffon Gérard coat in 2014).
It’s cool to look at this new coat and see how I have progressed. And I know that the next coat I make should be even better for having made this one.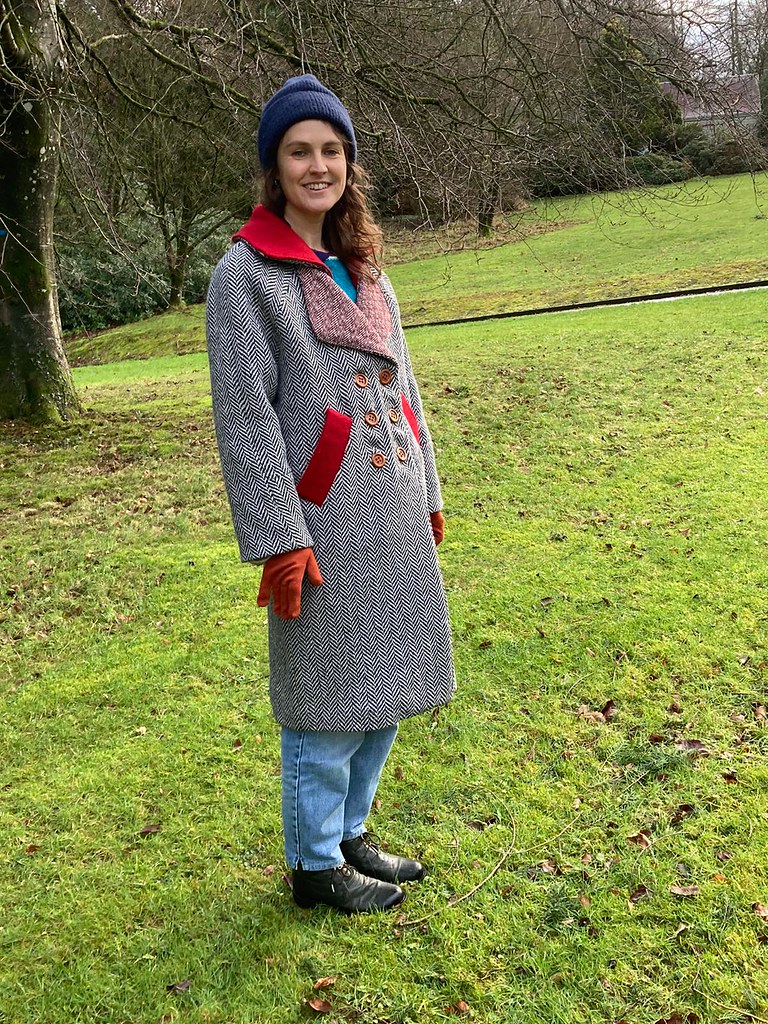
25.11.21
Powerpuff sleeve experiments


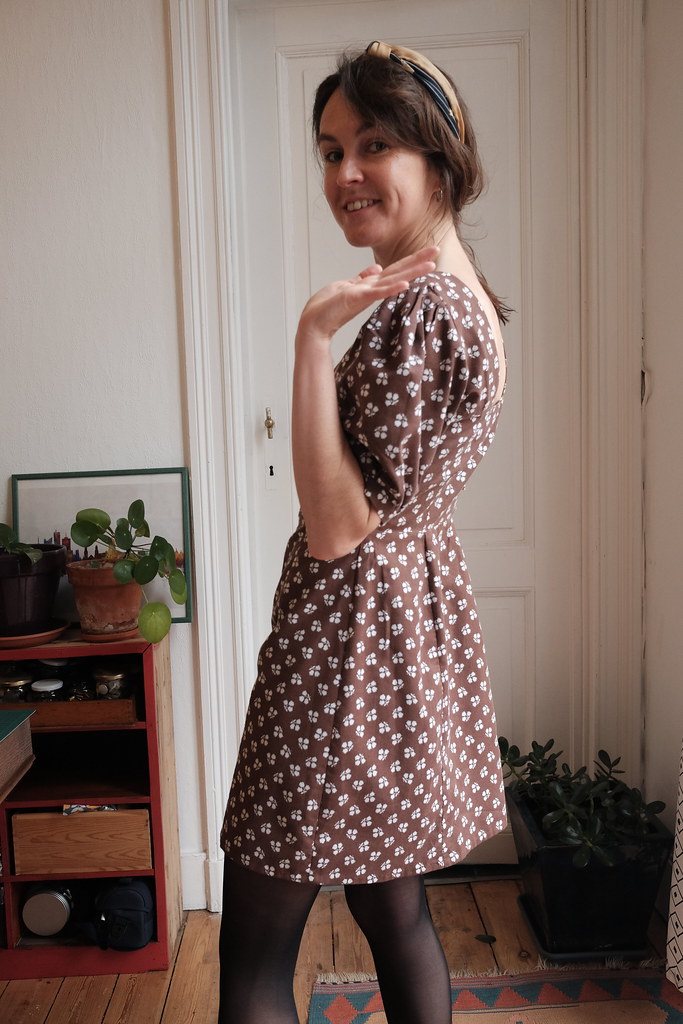
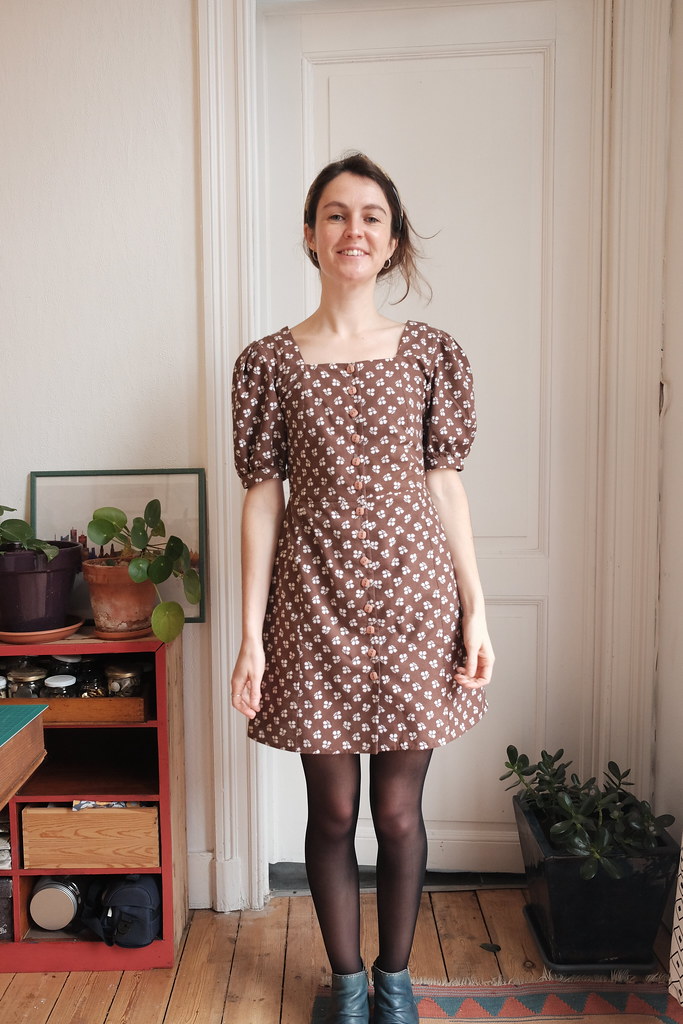
I’m really happy with this dress as I worked slowly and carefully on drafting the pattern over several weeks. I had an idea in my mind of what I wanted and I used up plenty fabric scraps and muslin to test out different modifications. I knew I wanted to embrace the square neckline and puff sleeves trend in a dress that has a nice balance of looking fitted but feeling casual to wear.
The front bodice is built around princess seams but the upper bodice side panels are separate pattern pieces (which you can’t really see in this fabric). The skirt is a gored slight tulip shaped skirt that continues down from the princess seam lines on the front bodice and the darts on the back bodice.
There are (cute pink) buttons all down the centre front. I spent a long time calculating the seam allowances and extra width to add to account for the button panels! I find one of the trickiest things about drafting your own patterns is that you obviously have to work out the pattern pieces and construction method for fastenings too. But that is also really exciting as you can think about what methods you like from previous patterns you have made and emulate those.
Once I was happy with the pattern I decided to make it up in this vintage bedding fabric (i.e. someone else’s old sheets) that I got in an Oxfam shop ages ago. It’s quite hard to photograph but I think it looks good with the pink buttons.
My plan now is to keep tweaking the pattern it and use it as the basis for future dresses. I think it would be interesting to play with contrasting fabrics for the different bodice pieces.
I made this mostly at Green Fabric in Forest where I have been going once a week to sew since September. This amazing place is a textile fablab, a coworking space for different types of creative and crafty pursuits, and it holds participatory workshops (e.g. upcycling, ceramics, making your own cosmetics). All with the aim of promoting the ecological transition at the local level! Having a place to sew that is not in my apartment has been great (who knew, doing everything in one place is not very stimulating!). I love the feeling of going there with a sewing plan and not being distracted by things at home, and it’s great to meet other people doing amazing creative things and to be surrounded by intriguing machines and materials!


This work is licensed under a Creative Commons Attribution-NonCommercial-NoDerivs 3.0 Unported License.
All photos are taken by me unless otherwise stated.